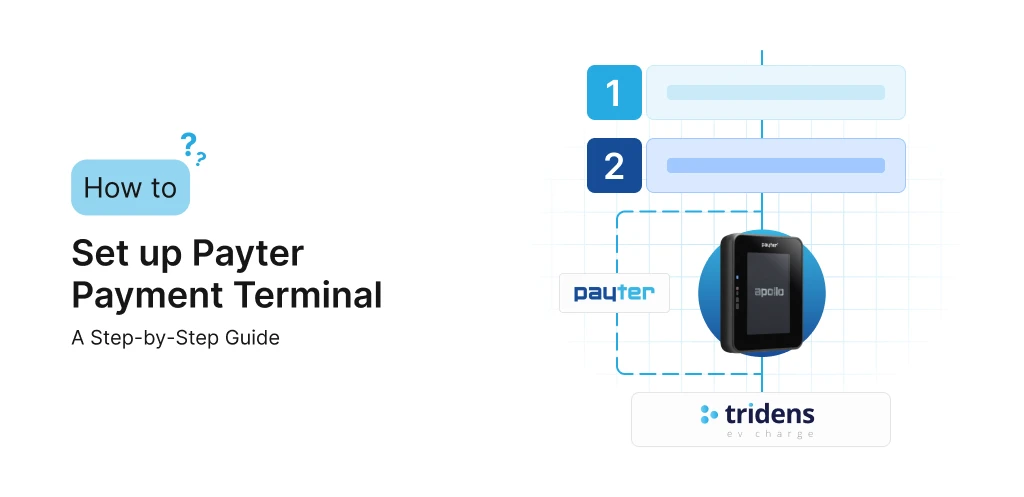
A complete guide to set up the Payter payment terminal for electric vehicle chargers.
This guide is for charge point operators (CPOs) who want to provide on-site card payments on EV chargers with Payter payment terminals, integrated and managed in Tridens EV Charge.
Quick Overview
Payter payment terminals read the payment cards and communicate with its back-office platform to handle card owner verification and payments. Their platform also communicates with Tridens EV Charge via OCPI (Open Charge Point Interface) protocol to exchange location, charger, tariffs, and session data. This enables the payment terminal to initiate charging sessions, keep track and eventually terminate them, using the cost for payment.

What You Need Before You Start
As a charge point operator you need:
- Active Tridens EV Charge environment with chargers onboarded.
- Establish agreement with Payter to open a new account for card payments, merchant payment processing, acquiring, and settlement.
- Payter device (e.g., Apollo or Apollo Polar) physically installed and powered. For all the device possibilities, we advise you to check the Payter’s offer.
- Registration token from Payter.
- Roaming configuration for Payter, set in Roaming.
- Pricing for sessions, set in Roaming Tariffs.
How Payter Terminal Works with Tridens EV Charge
Payter’s role is the payment terminal provider, abbreviated as PTP, having the back-office platform and payment terminals, which are also known as Points of Sale or POS.
Meanwhile, operators in Tridens EV Charge platform have the role of charge point operator (CPO), controlling and monitoring charging locations and infrastructure.
Tridens EV Charge exposes your charging network via OCPI, so the Payter platform with terminals can discover chargers, control sessions, and receive cost information.
Payter reads payment cards on-site and communicates with their platform to authorize money resources based on the tariff configuration. Once authorized, the Payter requests the charging session to start on Tridens via OCPI. At session end, the final payment amount is captured from the payment card owner.
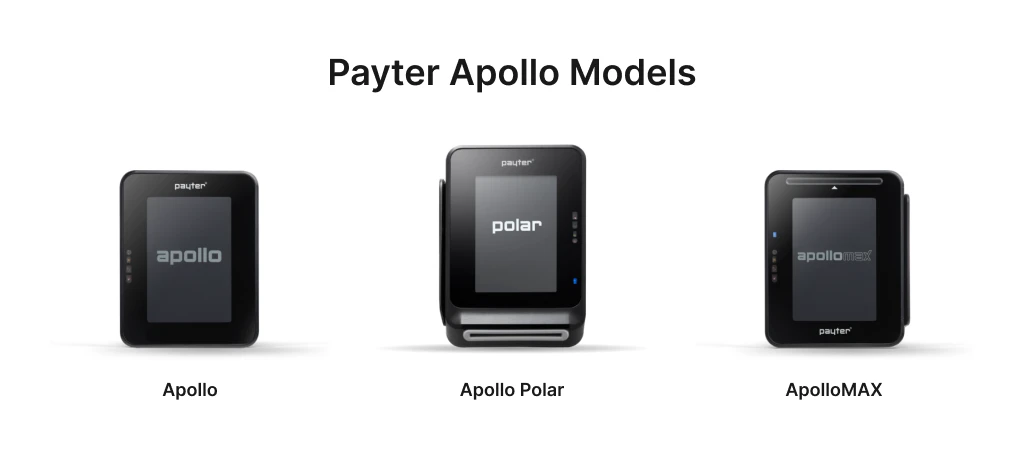
Payter Apollo Models
Payter offers different terminal model options where your model selection may also differ depending on where the terminal will reside, considering outdoor weather conditions or more friendly environment. It also depends if you require contactless or contact-based card reader and PIN entry.
A few models to consider:
- Apollo,
- Apollo Polar,
- and ApolloMAX.
Pro tip:
It is possible to use the payment terminal on a single charger or on multiple chargers as the kiosk.
Configuring Payter with Tridens EV Charge
Let’s dive into the steps required to set up the Payter payment terminals for EV charging in Tridens EV Charge.
Step 1: Add OCPI Roaming Profile
Move to Tridens EV Charge environment, open Roaming in the left menu and create or reuse a Roaming Profile with CPO role for the OCPI protocol. Set recognizable Name and Code of your business, Role, and your three-letter Roaming ID which will represent you to Payter.
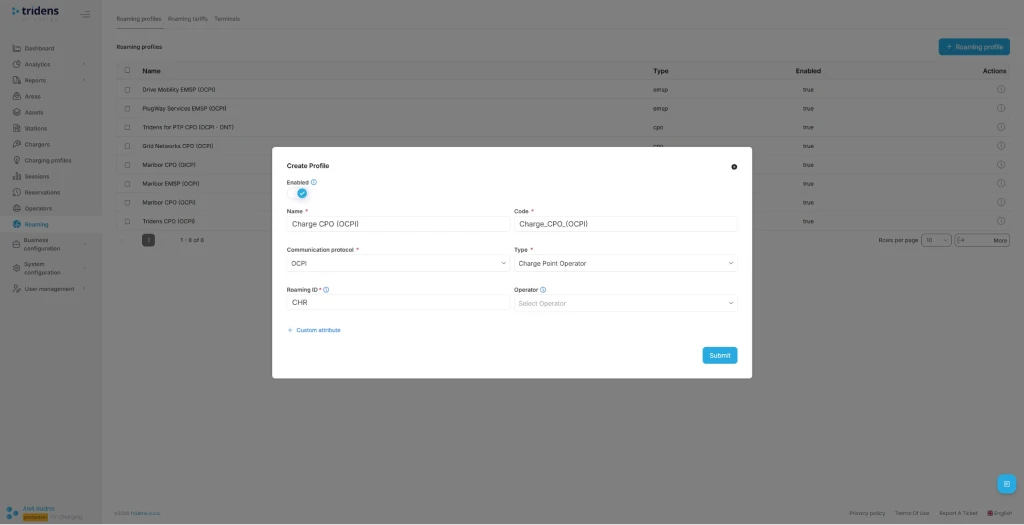
Find out more about Roaming Profiles.
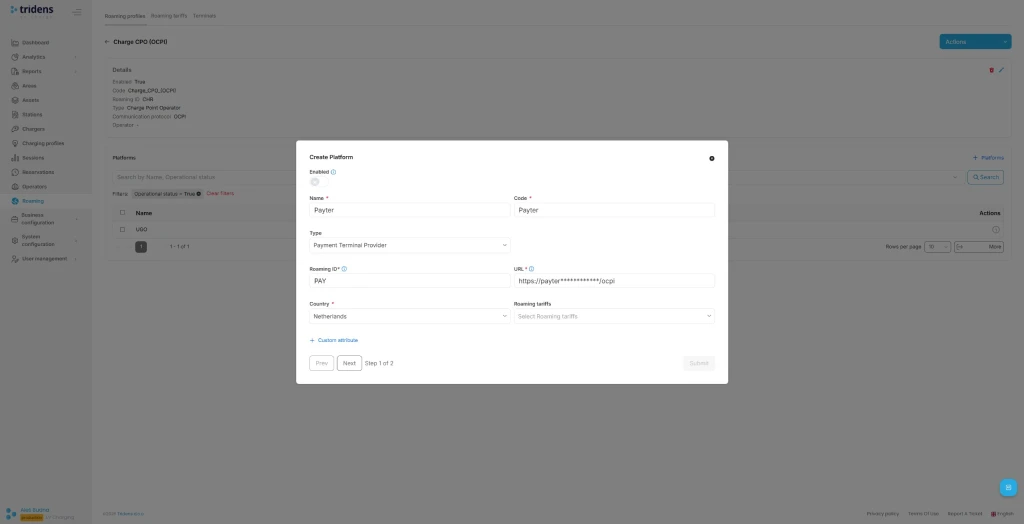
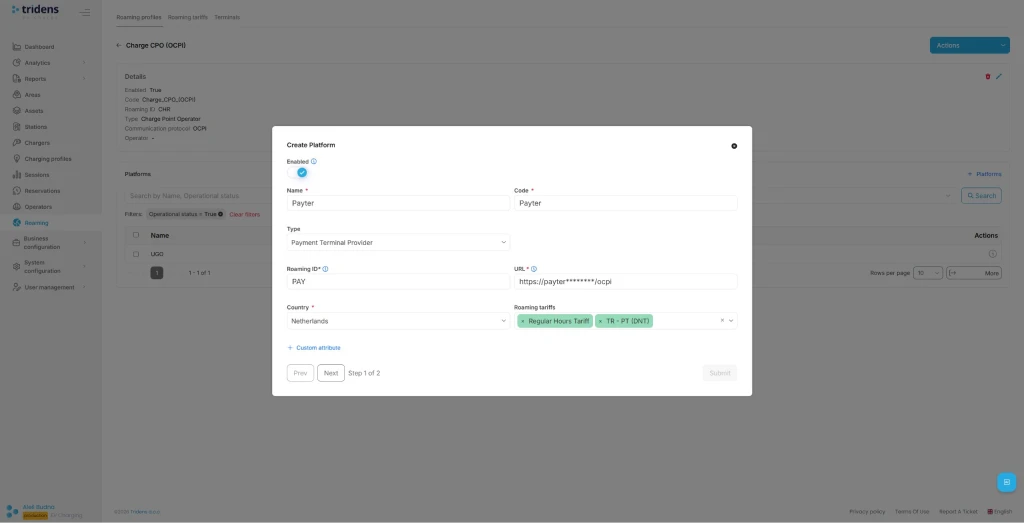
Step 2: Add Payter Roaming Platform
Next step in Tridens EV Charge is to go inside the Roaming Profile and add the Roaming Platform of Payter.
Populate Payter platform’s recognizable Name with Code, select PTP Type, Roaming ID, URL and operating Country.
Payter recommended settings:
- Name: Payter Terminal Provider
- Type: PTP
- URL: Defined by Payter.
- Roaming id: PAY
- Country: Netherlands
You can add or change Roaming Tariffs later for the cost calculations used for payments.
Interested in more? Check out Roaming Platforms documentation.
Step 3: Use the Registration Token
In the next step of Roaming Platform configuration, registration dialogue shows up. Insert the registration token (Token A) provided from the Payter and Submit the form.
On the Roaming Platforms overview, select the recently created platform and hit Register Credentials action.
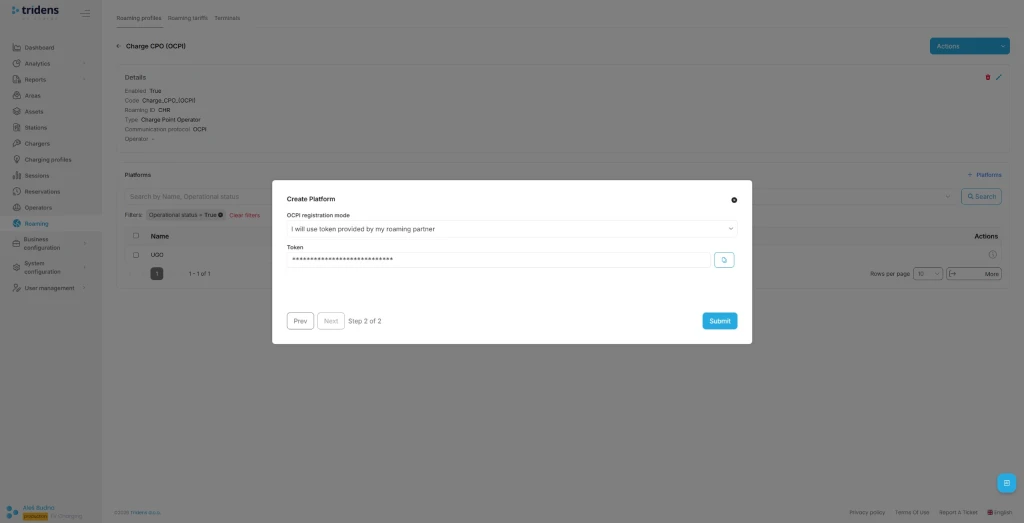
You can later Update credentials to renegotiate or Invalidate credentials to stop the communication.
It is also possible to register credentials in the opposite direction, where the new token is generated by Tridens EV Charge at the platform configuration dialogue. If such principle is used, you need to pass this token from Tridens EV Charge to Payter support in a secure manner, after which the Payter will do the communication handshake. Use URL that appears in the dialogue.
Check out OCPI registration for additional explanations.
Step 4: Expose Your Charging Infrastructure
You want to expose your charging infrastructure to Payter. To achieve this, assign an unique Roaming ID for desired Areas, Chargers and Connectors in Tridens EV Charge and enable roaming on chargers.
Connectors in payment roaming also need to have the ‘physical_reference’ custom attribute set for the Payter integration to represent a relation to its physical appearance code label.
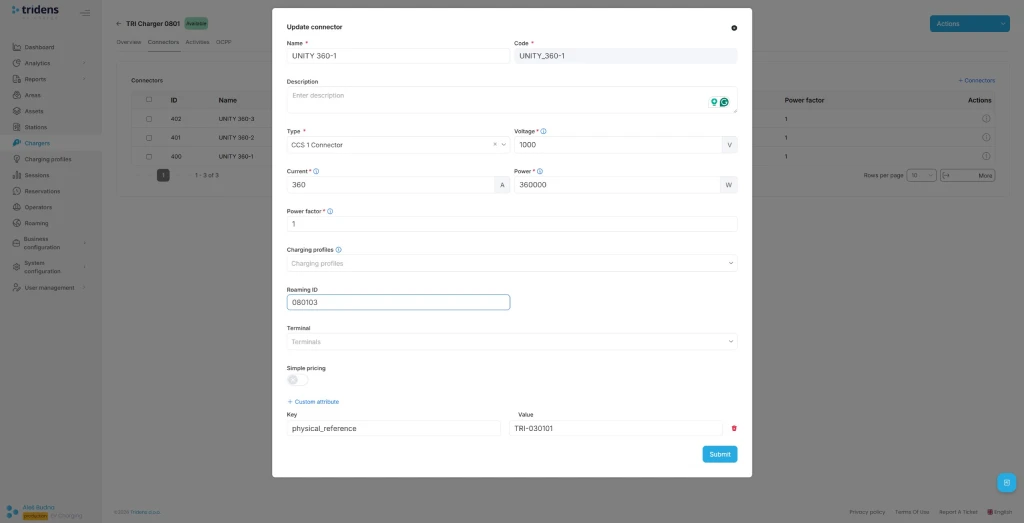
More details about applying the roaming settings on your charging infrastructure in Tridens EV Charge is described at Areas and Roaming Profiles.
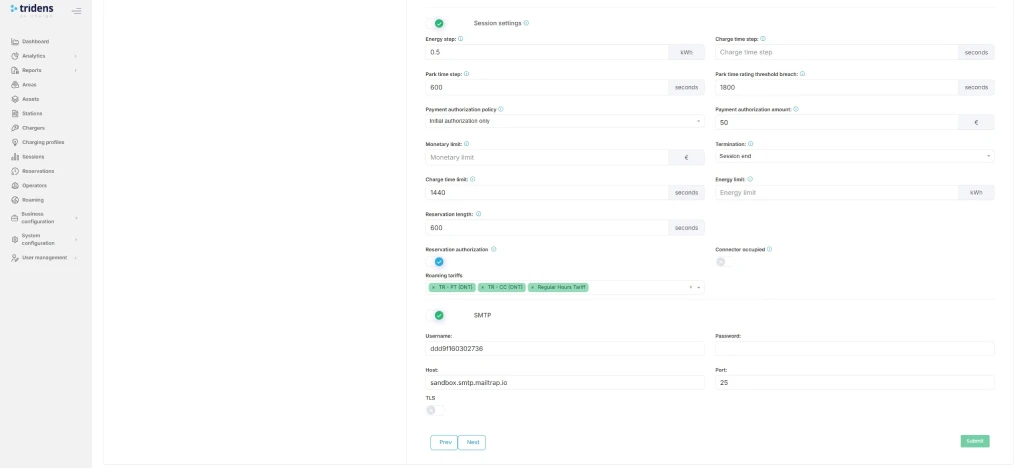
Step 5: Assign Expense Roaming Tariffs
You need to define the expense tariffs and prices for calculating the costs of using your chargers. These costs will be used for card payments. Tariffs are schedule-based, with recurrency and one-time options. Expenses can be set for energy, charging time, parking time, and general flat fee, including VAT control and the total money reservation amount.
Go to Roaming in the left side menu and select Tariffs, where you need to add a new Ad-hoc type tariff definition with time validity and maximum amount limit, for example 100 EUR, which is then used by Payter to authorize the money amount of the payment card customer.
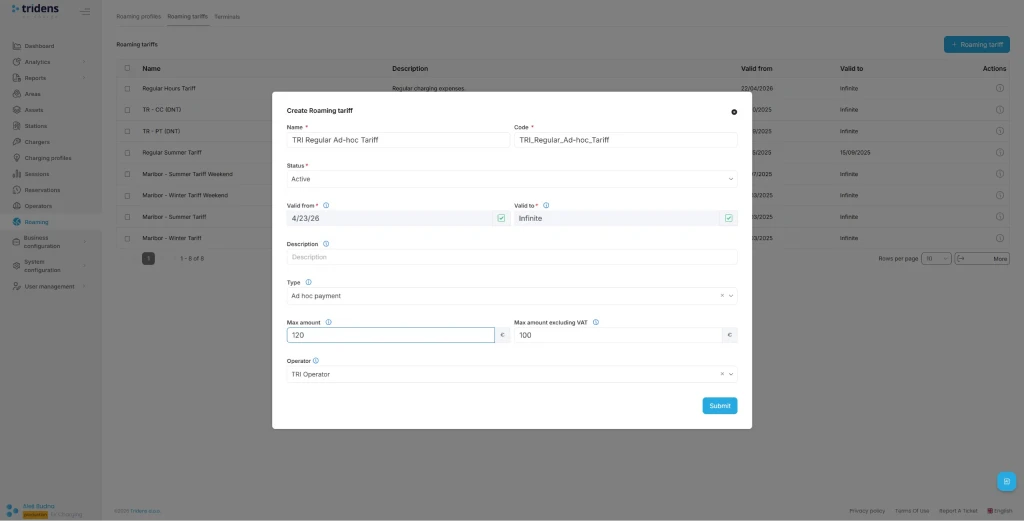
In the next step, add the Tariff Elements with cost (energy, time, flat) and recurrency time settings.

Assign Roaming Tariffs on the charging infrastructure context (one of Site/Operator/Area/Charger/Connector) and also to the Roaming Platform of Payter.
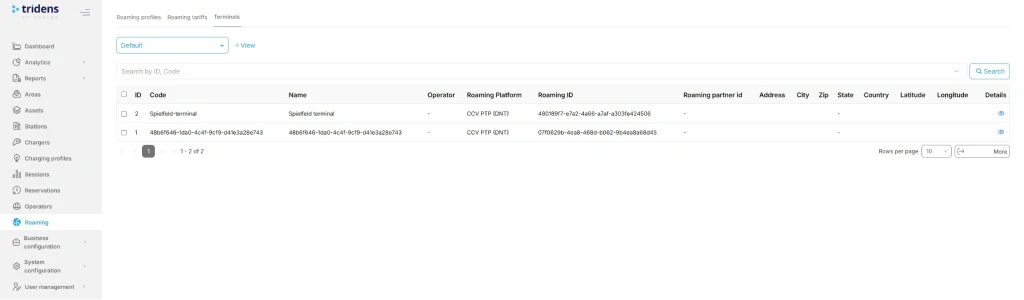
Step 6: Fetch Terminals from Payter
Fetch Terminals from Payter to Tridens on the Roaming Platform.
Assign Terminal’s Roaming reference with predefined CPO name as agreed and assigned by Payter at onboarding. This attribute may also be referred to as the customer reference.
Assign Terminal to the desired Area and/or Connector. This way, Payter will recognize which terminal serves to which exact location, charger, and connector.
Step 7: Charger and Session Settings for Smooth Operations
As the CPO, you want to ensure that charging infrastructure events, including session events, are properly exchanged. Thus, the charger configuration in Tridens EV Charge must meet a few important considerations, resulting in events reported on regular intervals with sufficient data (power and energy progression) and cover border cases. This will contribute to payment terminals working properly and external users having better experience of charging.
A few general rules of thumb:
- Set reasonable meter value reporting interval. We recommend 15 seconds.
- Set at least reporting of power import (kW) and energy import (kWh) measurands.
- Align charger timeouts with Tridens’ ready-session expiration to avoid dangling sessions.
Feel free to get through the blog How to Use Tridens EV Charge: From Onboarding to Testing the Charger.
We advise you to follow the guidelines defined in Charging Session Integration and if facing an issue, it is likely you will find the solution for yours in the Charging Session Malfunctions page, where common cases are described with solutions and preventive measures.
Test the Full Flow
Once your Payter terminal is ready with Tridens-Payter communication established by the registration and locations with tariffs exposed, you can proceed to the test flow and try out the charging sessions initiated from the terminal.
We strongly advise you to test the following operations:
- Approach to the Payter’s physical terminal, plug-in your EV and tap the screen. Find the Start button on screen. You should be able to see available locations and chargers bound to this specific terminal.
- Select your charger and present your payment card which will be authorized (reserved) for the max. amount configured in tariffs.
- If payment authorization succeeds, the charging of EV should start soon.
- Verify that session is charging and that you can see the progress on Tridens EV Charge portal in Sessions section.
- Stop the session at the terminal by presenting the payment card again.
- Payment terminal must show the receipt.
- Verify that amounts are properly calculated on receipt and Tridens EV Charge portal in Sessions based on your desired Roaming Tariffs configuration.
- Confirm that amount is properly captured from the payment account, meanwhile the remaining reservation amount is released.
- We embrace you to thoroughly test the border cases:
- No charging expenses, for example if no energy is charged to EV. Expect authorized payment amount released.
- Charging above the max. limit. Terminal is expected to automatically stop the session when max. amount threshold is achieved.
- Invalid authorization of payment card. Charging prevented.
- Request the stop of charging session from different sources: Tridens EV Charge portal, electric vehicle, terminal, charger’s emergency button. Confirm all scenarios end up in a properly completed session with payment capture.
- Kiosk mode or single charger mode. Depends on your use case.
Troubleshooting
| Occurences | Reasons | Solution |
|---|---|---|
| Locations and charger data not in-sync. | Credentials malfunction. | Repeat the registration and handshake process described in Step 3. |
| Network connectivity issue. | Ensure both platforms are communicating. Check out the status pages. Contact the platform operators, if necessary. Tridens Status Page | |
| Roaming disabled. | Ensure roaming settings are enabled in Tridens EV Charge environment: Roaming Profile, Roaming Platform and roaming settings of Area, Charger, Connector. | |
| Tariffs do not appear in Payter terminal. | Roaming Tariffs configuration. | Ensure that Roaming Tariffs are properly configured in Tridens EV Charge with valid date-times and cost. Ensure having the max. limit set. Tariff must then be applied to the Roaming Platform and charging infrastructure scope (e.g., Site or Charger). Roaming Tariffs |
| Cost not calculated on session. | ||
| Not able to start the charging session from the terminal. | ||
| No request is transmitted to the CPO. | ||
| Session progress issues if you are the CPO. | Charger operations or system settings. | Check out the Charging Session Malfunctions with list of the most common issues and resolutions with preventive measures. Also advised to verify the Charging Session Integration guide. |
| Terminal not responding. | Terminal’s software issue. | Attempt to restart the terminal by the button or plugging off the cable. If on/off switch doesn’t help, we advise you to check the device’s user manual. Manuals and instructions are available on Payter Docs as well. When necessary, contact Payter support to verify the firmware. |
| Not able to start the charging session from the terminal. | ||
| No request is transmitted to the CPO. |
You may find helpful explanations in a technical documentation of Payment Terminal Integrations.
If you’re having any trouble getting your terminal live, don’t struggle in silence! Feel free to talk to us, and we’ll help you get everything configured and ready for charging.
FAQs About Payter Payment Terminal Configuration in Tridens EV Charge
Make agreement with Payter, then go into Tridens EV Charge and configure the roaming platform, exchange the registration token and register credentials. Assign area, chargers and connectors for roaming, including tariffs.
Yes, you can use the Payter payment terminal as a kiosk covering multiple chargers at once.
You make an agreement with Payter in a matter of days, then proceed with setup in your Tridens EV Charge environment, by following the steps in this article to make a connection, which should not take more than an hour. Then you need to assign roaming identifiers on areas, chargers, and connectors, including tariffs and fetch-activate the terminals. Longevity depends on how many charging infrastructure entries and different tariffs you need to manage and reference to the terminals. Thorough tests are strongly advised.
Payter terminal reads the payment card, reserves customer’s money and requests Tridens over OCPI to start the charging session. At session end, total cost amount is captured from the reservation, the rest is released.
You have multiple options to connect by using the cable internet, wireless internet, or mobile network. Check your device manual for supported connectivity options. Network stability is important for high availability of operations.
Payment card related data is not exchanged between Payter and Tridens, since the card account verification and captures are domain of Payter. Tridens and Payter communication by OCPI goes with HTTPS calls, where each side verifies the other to have a trusted certificate that provides encrypted communication. Another level of OCPI security is applied by using the mandatory access tokens in each request. Access token is negotiated at the initial registration and is being verified at each further message exchange between the sides. Communication access can be renewed or discarded at any time by using Tridens EV Charge portal.
Version of OCPI protocol used between Tridens and Payter can be renegotiated to the latest mutual by first invalidating the credentials of the roaming platform, then assigning the new registration token (Token A) and triggering the registration process, as described in Step 3.
Follow the documentation of your Payter device model. If necessary, contact the Payter support.