
In one of our previous articles we already presented deployment of Oracle BRM 12 Cloud Native Deployment version to Oracle Cloud. Oracle Cloud is very well-designed cloud environment, which is also affordable and constantly evolving. However, if you want to deploy Oracle BRM 12 to Oracle Cloud you have to use some non-free features and components of Oracle Cloud that you can test for free for 30 days only. After that you have to upgrade to paid account if you want to continue using it.
You also have another option if you want to test out Oracle BRM 12 Cloud Native Deployment. You can go for an on-premise deployment and deploy BRM to your local servers. The main purpose of this article is to show you how you can achieve that. This article will show you how you can create and run a local Kubernetes cluster using Minikube and how you can deploy Oracle BRM 12 into your newly created and configured cluster. Please note that Minikube is suitable only for testing and development purposes, and you should not use it on a production environment. Let’s take a look at specific components of our system that we will use and how to install them.
Table of contents
About Oracle Linux 8
We will base our solution on a Linux operating system, namely Oracle Linux version 8. This Linux distribution is provided by Oracle and available for free. It is based on Red Hat Enterprise Linux. For this operating system you can also get a commercial technical support if you need it. It is also worth mentioning that Oracle Cloud is powered mainly by Oracle Linux servers.
We will use Oracle Linux version 8 for the purpose of this article. Of course you can use also other Linux distributions but instructions for preparing your environment can vary according to that. If you want to use Oracle Linux, you can download it freely from Oracle Software Delivery Cloud or from many mirror sites available worldwide.
You can install Oracle Linux directly on your servers or inside a virtual machine. In the latter case your virtualization software has to support nested virtualization if you want to closely follow instructions in this article.
After installing Oracle Linux make sure to update your software packages to latest versions before continuing:
sudo yum update
Then install some other required packages:
sudo yum install -y yum-utils device-mapper-persistent-data lvm2
Now you are ready to start preparing your Kubernetes cluster. First we will install Docker.
Installing Docker
Docker is a set of products that allows you to deploy and run containerized software. Containers are software bundles that bundle their own software, configuration and all needed libraries into one package, called container.
Here are instructions for installing Docker on Oracle Linux 8:
sudo curl https://download.docker.com/linux/centos/docker-ce.repo -o /etc/yum.repos.d/docker-ce.repo
sudo yum makecache
sudo yum remove podman-manpages
sudo dnf -y install docker-ce –nobest
systemctl start docker
systemctl enable docker
systemctl status docker
To enable Docker for current user:
sudo usermod -aG docker
newgrp docker
Installing kubectl
We will continue now with installing kubectl, which is command-line tool that allows you to control a Kubernetes cluster.
Download the latest stable version of kubectl and move it to a system folder:
curl -LO https://storage.googleapis.com/kubernetes-release/release/`curl -s https://storage.googleapis.com/kubernetes-release/release/stable.txt`/bin/linux/amd64/kubectl
chmod +x ./kubectl
sudo mv ./kubectl /usr/local/bin/kubectl
You can check if kubectl is working by issuing the following command:
kubectl version
You will receive output similar to this:
Client Version: version.Info{Major:”1″, Minor:”17″, GitVersion:”v1.17.3″, GitCommit:”06ad960bfd03b39c8310aaf92d1e7c12ce618213″, GitTreeState:”clean”, BuildDate:”2020-02-11T18:14:22Z”, GoVersion:”go1.13.6″, Compiler:”gc”, Platform:”linux/amd64″}
The connection to the server localhost:8080 was refused – did you specify the right host or port?
For now you can ignore error in the last line of command input.
Installing Oracle VirtualBox
VirtualBox is a virtualization product provided by Oracle and we will use it as a hypervisor for our minikube Kubernetes cluster. To install VirtualBox to our system we must add an additional repository first:
cd /etc/yum.repos.d/
sudo wget http://download.virtualbox.org/virtualbox/rpm/rhel/virtualbox.repo
Install some other needed packages:
sudo yum install binutils gcc make patch libgomp glibc-headers glibc-devel kernel-headers kernel-devel elfutils-libelf-devel
Now you are ready to install VirtualBox:
sudo yum install VirtualBox-6.1
At this point we are ready to install Minikube.
Installing Minikube
Minikube is Docker-based Kubernetes cluster that is suitable for testing and development purposes. We will deploy Oracle BRM 12 Cloud Native Deployment which is containerized version of Oracle BRM to Minikube Kubernetes cluster.
Now install minikube:
curl -Lo minikube https://storage.googleapis.com/minikube/releases/latest/minikube-linux-amd64 && chmod +x minikube
sudo mkdir -p /usr/local/bin/
sudo install minikube /usr/local/bin/
We can now start minikube that will prepare its environment and create a new virtual machine. Default minikube values for virtual disk size and amount of memory for virtual machine are too low for Oracle BRM, therefore we will explicitly raise them (obviously you must have enough physical memory available for that else you may experience various issues):
minikube start –disk-size=’800g’ –memory=’8192m’
You can check if minikube was successfully configured:
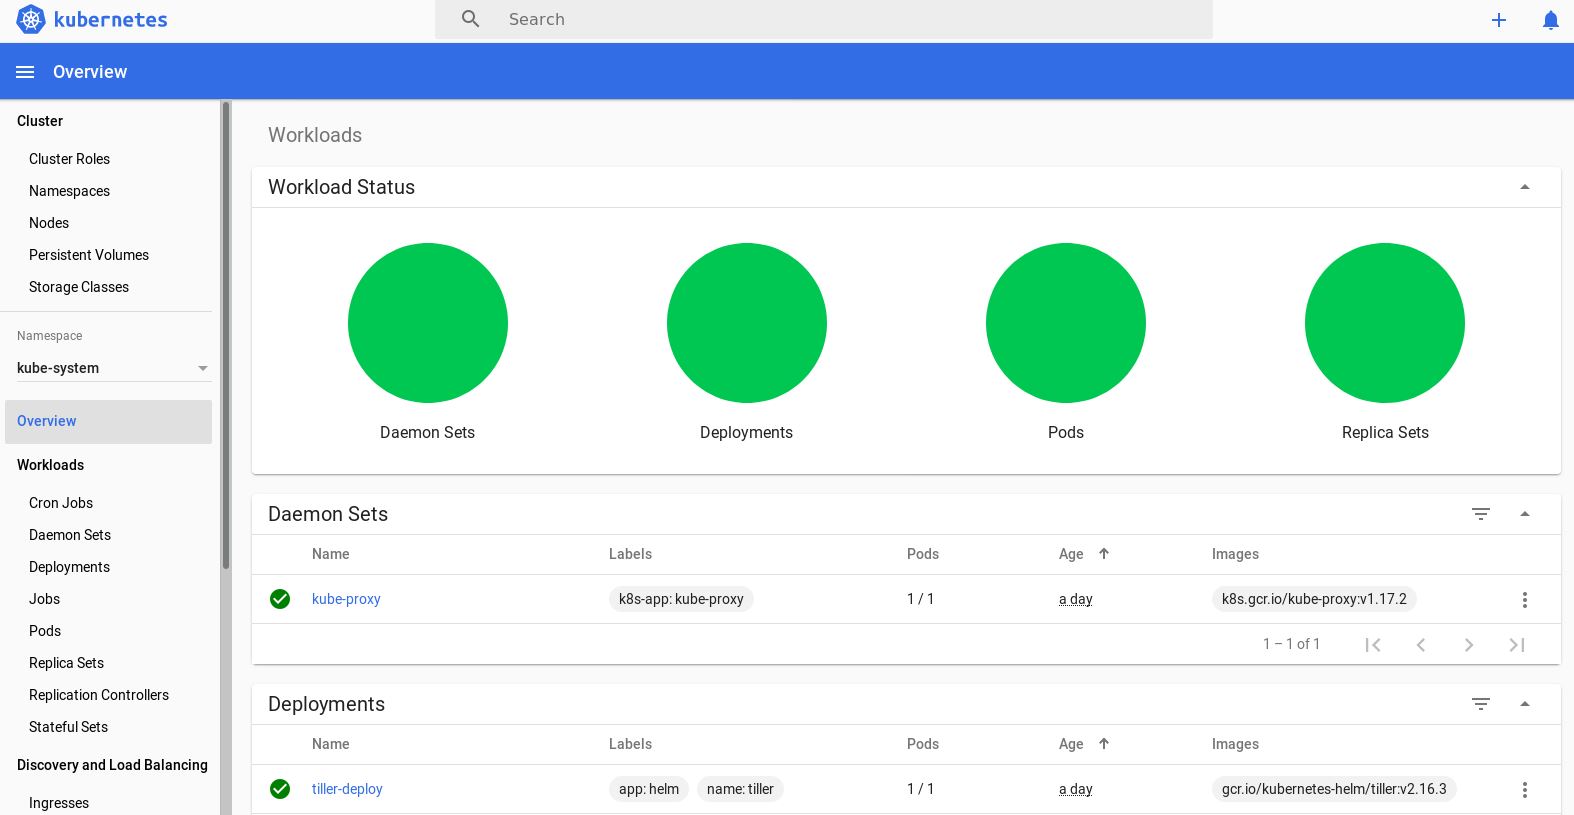
kubectl -n kube-system get pod
You will get some output like this:
$ kubectl -n kube-system get pod
NAME READY STATUS RESTARTS AGE
coredns-6955765f44-d8wj4 1/1 Running 0 7m54s
coredns-6955765f44-fd2lt 1/1 Running 0 7m54s
etcd-minikube 1/1 Running 0 7m46s
kube-apiserver-minikube 1/1 Running 0 7m46s
kube-controller-manager-minikube 1/1 Running 0 7m46s
kube-proxy-j575p 1/1 Running 0 7m54s
kube-scheduler-minikube 1/1 Running 0 7m46s
storage-provisioner 1/1 Running 0 7m52s
Load environment variables needed to work with minikube and docker on your environment:
eval $(minikube docker-env)
We need an additional component before we deploy BRM to our newly created cluster – Helm.
Installing Helm
Helm is a package manager for Kubernetes. Helm charts are used to manage, install and upgrade your Kubernetes cluster. Oracle bundles Helm charts needed for deploying and configuring Oracle BRM 12 deployment in their Cloud Native Deployment version of BRM.
Now let’s install Helm:
curl -LO https://git.io/get_helm.sh
chmod +x ./helm.sh
./get_helm.sh
Perform initial configuration of helm:
helm init –history-max 200
Now your environment is ready to start deploying Oracle BRM 12. Obviously you have to perform some preparation steps on your Oracle Database instance so that Oracle BRM can use it. Detailed explanation of these steps exceeds the scope of this article, but you can find all the necessary information about this in Oracle BRM documentation or contact us and we will be glad to help you.
Deploying Oracle BRM 12 to Kubernetes cluster
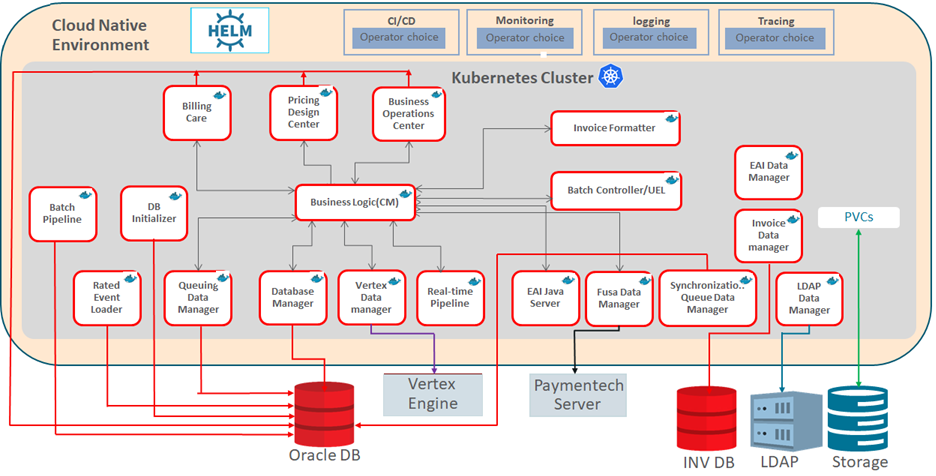
First, you have to load all provided docker BRM images to your docker environment. Oracle provides you with two Helm charts – the first one (oc-cn-init-db-helm-chart) initializes your DB schema to prepare it for BRM, and the other one (oc-cn-helm-chart) deploys various BRM components that you choose.
You have to start by deploying oc-cn-init-db-helm-chart. First you have to load init_db Docker image into Docker repository:
docker load –input oc-cn-brm-init-db-12.0.0.2.0.tar
After image is successfully loaded, extract oc-cn-init-db-helm-chart and copy values.yaml to override-values.yaml. Then edit override-values.yaml according to Oracle BRM 12 Cloud Native Deployment documentation. Leave “imageRepository” value blank. In a “wallet” section set credentials for Oracle wallet. You have to set your database connection settings under a “db” section. After you configure all necessary values in override-values.yaml file, you can deploy init_db image to your Kubernetes cluster using Helm chart:
helm install oc-cn-init-db-helm-chart –name initdb –values oc-cn-init-db-helm- chart/override-values.yaml
Now helm will deploy BRM DB initialization image to Kubernetes cluster and start to prepare your database for BRM.
You can check the status of your deployment with:
helm status initdb
After a while initdb pod will finish preparing your database and you can delete the current deployment of initdb image:
helm delete initdb
Now unpack oc-cn-helm-chart.tgz and copy values.yaml to override-values.yaml. Now edit various fields in override-values.yaml according to instructions found in Oracle BRM 12 Cloud Native Deployment. You can copy some fields (like “wallet” and “db” sections) from init-db chart that you used before.
Use “docker load –input” command to load all docker images that you want to deploy to Docker repository.
Then you can deploy Helm chart:
helm install oc-cn-helm-chart –name occn-ps2 –namespace ocgbu –values oc-cn-helm-chart/override-values.yaml
Now BRM will deploy to your local Kubernetes cluster. You can find some more tips about monitoring cluster and diagnosing issues in our previous article.
You can also monitor your Kubernetes cluster with Kubernetes Dashboard:
minikube dashboard
Dashboard will be open in a new browser window.
Conclusion
This article guides you through the main steps of deploying Oracle BRM Cloud Native Deployment to a local minikube Kubernetes cluster. You can use this deployment for testing and development purposes. If you need any additional help with deploying Oracle BRM to minikube, need suggestions, or if you are searching for a reliable solution provider for all your billing needs, feel free to contact us.