Oracle BRM 12 is one of the best enterprise billing and revenue management systems on the market and is setting the standards that others strive to meet. BRM has years and even decades-long history (together with its predecessors Infranet and Portal). After Oracle acquired Portal Software in 2006, development continued with new service packs and new software versions introducing new features regularly.
Recently Oracle BRM 12 turned an entirely new chapter and reached a new exciting major milestone with releasing Oracle BRM Cloud-Native Deployment. This release allows BRM to deploy natively to Kubernetes cloud environment, which opens new ways of using BRM in SaaS (software as a service), PaaS (platform as a service) and IaaS (infrastructure as a service) solutions. Deploying to the cloud brings us some benefits over the traditional model of software deployment, such as scalability and reliability. When deployed to the new cloud system and hardware resources can be added to BRM on demand if needed without concerns over big capital investments in additional hardware. You can scale your deployment dynamically and add other nodes and replicas for specific BRM services or remove them if they are not needed anymore. Kubernetes takes care of your running pods and makes sure that all services are up and running, resulting in above-average uptime for cloud deployments as compared to on-premise software deployment.
Officially Oracle Cloud is supported currently for Oracle BRM Cloud Native deployment, although it is possible to deploy BRM to some other cloud environments also. In this article, we will take a look at how to deploy Oracle BRM to Oracle Cloud.
Table of contents
About Oracle Cloud
Oracle Corporation is offering its cloud computing service (Oracle Cloud) that provides services, storage, servers, etc. through a global network of managed data centers. You can choose which managed data center you want to use when setting up your cloud environment. Usually, you want to select one which is geographically close to you. Some basic features of Oracle Cloud (like some essential instances of Autonomous Database and Virtual Machine – with limitations) are in a free tier of Oracle Cloud (named “Always Free Eligible”) and can be used for free for an unlimited time. You can also take advantage of a 30-day free trial, and in that timeframe, you can test out more advanced features and possibilities that Oracle Cloud is offering to you. Your account can always be upgraded to a paid version. Oracle Cloud provides a handy cost estimation calculator where you can set up your infrastructure and services that you want to use, and the calculator returns you cost estimations for your chosen set up.
Now let’s take a look at how you can perform Oracle BRM Native Cloud Deployment in Oracle Cloud free of charge for testing purposes.
Deploying Oracle BRM 12 to Oracle Cloud for testing purposes
First, you have to get a correct version of BRM software from Oracle Software Delivery Cloud. Search for “Oracle Communications Billing and Revenue Management Cloud-Native Deployment Option” and get the latest available version. Then you have to sign up for using Oracle Cloud. After signing up and setting up your account, you will be presented with Oracle Cloud Dashboard screen similar to that shown on Picture 1.

As you can see, there are some “Always Free Eligible” options presented to you here. Unfortunately, to test out the Oracle BRM Cloud-Native Deployment free tier of Oracle Cloud will not suffice. You will have to use some more advanced features, but you can try them out free of charge for 30 days.
Preparing Database System for Oracle BRM services
First, you need to prepare a database for your BRM deployment. Open the main menu by clicking on a hamburger button to open the main menu, then choose the “Bare Metal, VM, and Exadata” option under the “Database” section. Now click on the “Create DB System” button. Here you can configure your new database instance as shown in picture 2.

You must choose a name for your DB system and select on which availability domain in your chosen managed data center do you want to run it. Choose the “Virtual Machine” shape type and some basic shape for your database (it will suffice for our testing purposes). Choose “Enterprise Edition High Performance” as your Database software edition. Note that if you choose “Enterprise Edition,” then your database instance will not support partitioning, and your BRM deployment will fail as a consequence. You can then also tune some other instance parameters and upload your SSH public key for access. On the next page, you can configure some more options and define administrator credentials for your database instance (they are essential, remember them). Now you can confirm your settings and DB System will be created.
One important note here: if you get a message that you reached your service limit for creating DB System in this availability domain, then you have to open a service request (SR) for Oracle Support to enable that option to you. Go to Main menu -> Governance -> Limits, Quotas, and Usage. Find a link to request a service limit increase on that page. After opening a service request, it may take a few days to have that request granted, however usually such requests are resolved quickly.
Now that you have a DB system for our cloud-native BRM provisioned and running, you have to prepare DB tablespaces and schemas. First, you have to configure your Oracle SQL Developer (or another client) to connect to your newly created database.

One way to do this is to use the public IP address of your DB system. You can find your public IP address under the Nodes section of your DB system page. Use this address and other data found on your DB system page to configure the Oracle SQL Developer connection. Login as SYSDBA and perform preparatory steps for the database found in Oracle BRM documentation.
Preparing Kubernetes cluster for Oracle BRM services
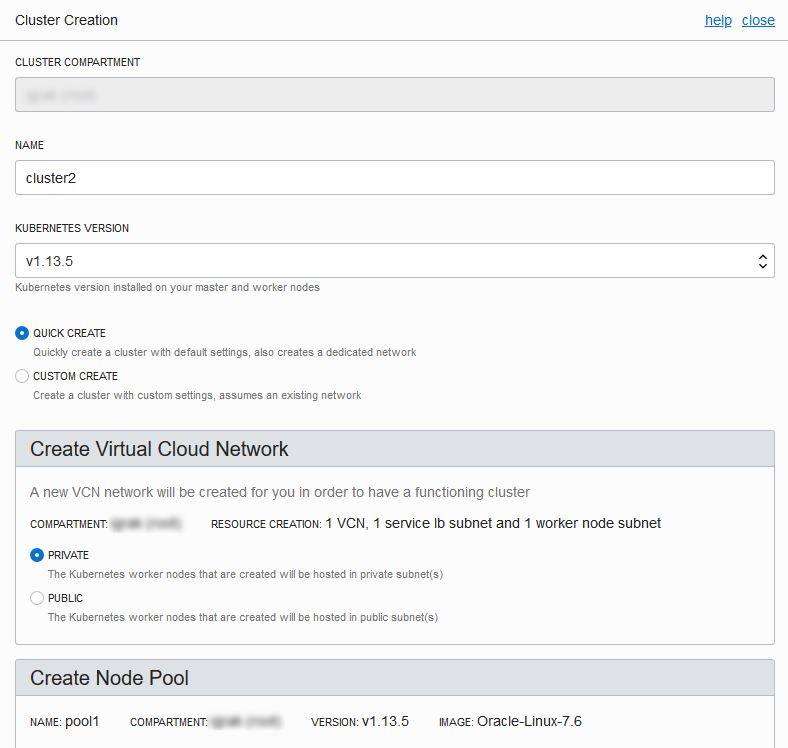
Now you have to prepare your Kubernetes cluster in Oracle Cloud. Open main menu -> Developer Services -> Container Clusters (OKE). Click on Create cluster and fill out the form to create a new cluster.
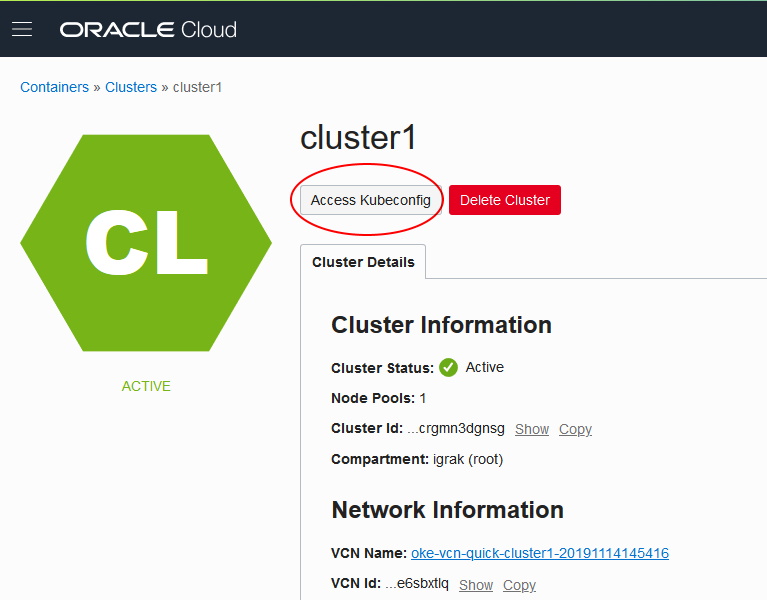
After your cluster is created, you also have to install docker, kubectl, and helm to your local machine. You can find instructions on how to install all these components on their corresponding official websites. Then you must configure your local environment to manage remote container clusters in Oracle Cloud. You can find instructions on how to do that by clicking on a button “Access Kubeconfig” as shown on
Deploying Oracle BRM Cloud Native Deployment to Kubernetes cluster
When your database is configured as per documentation, and your Kubernetes cluster created and running, you can proceed with deploying BRM. First, you have to load all provided docker BRM images to your docker environment, then tag them and push them to a remote repository in Oracle Cloud so that images will be found when you deploy helm charts.
Basically, you must follow the instructions on Oracle web page. But instead of pulling a hello-world image in step 3, you have to load Oracle BRM images from tar files.
When images are loaded and pushed to the repository in Oracle Cloud Infrastructure, you are ready to deploy helm charts.
Oracle BRM Cloud-Native Deployment package provides you with two charts:
- oc-cn-init-db-helm-chart that deploys init_db image which creates all necessary tables, indexes, views, etc. and loads initial default data into database for BRM services to be able to run,
- oc-cn-helm-chart that deploys BRM cloud-native services
You have to deploy oc-cn-init-db-helm-chart first to prepare your database for BRM services.
Go to folder where oc-cn-init-db-helm-chart is unpacked and copy values.yaml to override-values.yaml. Then open file override-values.yaml and configure all necessary values according to instructions found in Oracle BRM Cloud-Native Deployment documentation. Pay special attention to the fact that all passwords must be entered in base64 encoding.
You have to configure “imageRepository” field to point to your Oracle Cloud Infrastructure registry so that images can be found, for example:
imageRepository: “eu-frankfurt-1.ocir.io/frm097gtmuzm/”
Note also “/” which is required for chart to deploy correctly. In “db” section of your override-values.yaml file, you have to provide access data for your database. There is no need to use public IP as DB host here; actually, it is much better to use private IP address or DNS name for performance reasons.
After configuring override values for helm chart you can deploy it with the following command:
helm install oc-cn-init-db-helm-chart –name initdb –values oc-cn-init-db-helm-chart/override-values.yaml
Now helm will deploy BRM DB initialization image to Kubernetes cluster and start to prepare your database for BRM.
You can check the status of your deployment with:
helm status initdb
If you see any issues with pods there are multiple techniques to debug such issues. One basic approach is to check the logs of failing pod:
kubectl logs
Also, another command can provide you useful debug data:
kubectl describe pods
After your database is initialized, you can prepare another chart – oc-cn-helm-chart – for deployment. This chart will actually deploy BRM to your cluster. You can copy “db” section of override-values.yaml file from your oc-cn-init-db-helm-chart to oc-cn-helm-chart. Then you have to configure all other needed values in override-values.yaml in a similar way as for oc-cn-init-db-helm-chart. You can find a description of all the keys in the Oracle BRM Cloud Native Deployment documentation. Note that all passwords have to be base64 encoded. If you don’t want to deploy all BRM components, you can remove files of specific components from the templates subdirectory inside chart folder and remove relevant sections from override-values.yaml file.
You can then deploy BRM with the following command:
helm install oc-cn-helm-chart –name occn-ps2 –namespace ocgbu –values oc-cn-helm-chart/override-values.yaml
Note that you have to deploy oc-cn-helm-chart in a different namespace (in our example “ocgbu”) than oc-cn-init-db-helm-chart.
It is useful to monitor your Kubernetes deployment with Kubernetes Dashboard. Because Kubernetes Dashboard is not deployed by default, you can deploy it to your cluster using the following command:
kubectl apply -f https://raw.githubusercontent.com/kubernetes/dashboard/v2.0.0-beta6/aio/deploy/recommended.yaml
Then you have to run proxy service to access the Dashboard:
kubectl proxy
Now you can open Kubernetes Dashboard in your browser using the following address:
http://localhost:8001/api/v1/namespaces/kubernetes-dashboard/services/https:kubernetes-dashboard:/proxy/#/login
You can see Kubernetes Dashboard display of deployed services on picture 6.

It is also possible to open shell inside one of the running pods. This can sometimes be useful for a number of reasons, for example, if you want to access some internal logs. You can open shell inside a pod with a following command:
kubectl exec -n -it — /bin/bash
Logs can usually be found on a path /oms_logs in pod.
Congratulations, you successfully deployed Oracle BRM Cloud-Native Deployment to Oracle Cloud!
Conclusion
This article explains all the main steps needed to deploy Oracle BRM Cloud-Native Deployment to Oracle Cloud Infrastructure. If you need any additional help with deploying Oracle BRM to Oracle Cloud, need suggestions, or if you are searching for a reliable solution provider for all your billing needs, feel free to contact us. But deploying Oracle BRM Cloud-Native Deployment to Oracle Cloud is not the only option to test it out. You can deploy it also to your local server environment. We will look at how to do that in one of our upcoming articles.