Service Desk
Category:
Service Desk Set-Up
The Service Desk module in the Tridens Monetization EV Charge web app allows your team to create, track, and manage requests in one place. Follow these steps to set up and start using the Service Desk.
Step 1: Navigate to the Service Desk
- Log in to the EV Charge Web App.
- From the left-hand side menu, click on Service Desk.
- The Service Desk page will open.

Step 2: Select a View
At the top of the Service Desk page, you can choose how to view requests:
- Table View: Displays requests in a list format with sortable columns.
- Board View: Displays requests visually, similar to a job board in tools like Trello or Jira, where requests are organized by status.
Choose the view that best suits your workflow.
Step 3: Add a New Request
To create a new service desk request:
- Click on the Add button.
- A request creation form will appear, as shown below.
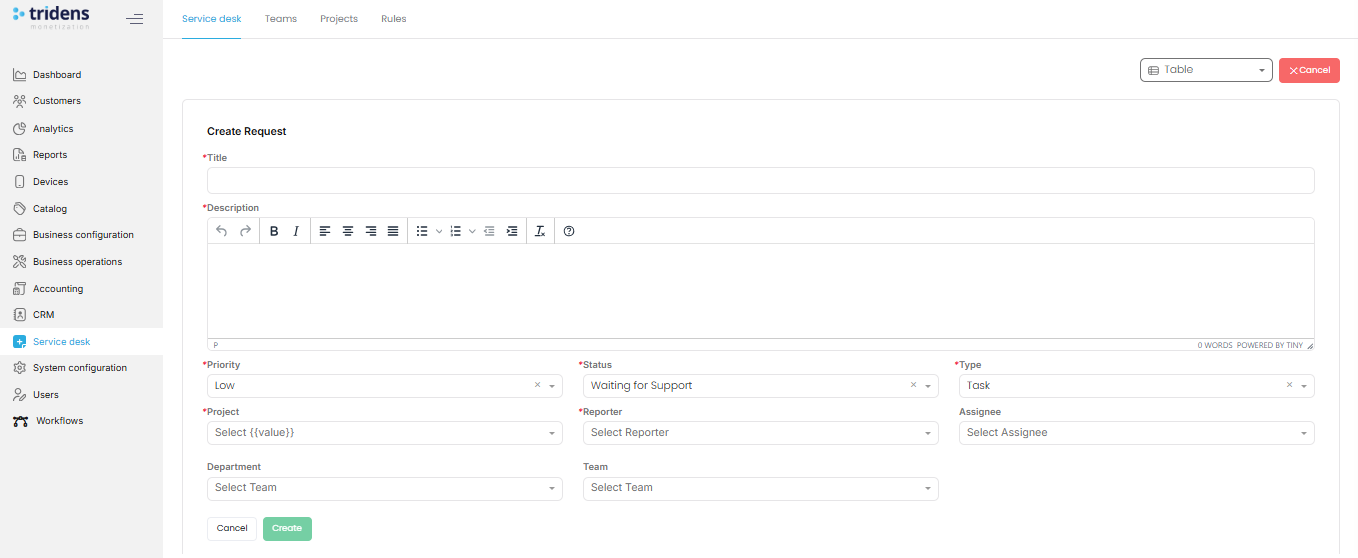
Step 4: Fill in the Request Form
Complete the form with the following fields:
- Title (required): Enter a clear and concise title for the request.
- Description (required): Provide detailed information about the issue, task, or request.
Use the formatting toolbar to add lists, bold, italic, and links if needed. - Priority (required): Choose the urgency level (e.g., Low, Medium, High).
- Status (required): Set the current state (e.g., Waiting for Support, In Progress, Completed).
- Type (required): Define the type of request (e.g., Task, Bug, Feature).
- Project: Select the relevant project (e.g., EV Charge).
- Reporter: Choose the person who is reporting the issue.
- Assignee: Assign the request to the responsible team member.
- Department: Select the department handling the request.
- Team: Choose the specific team if applicable.
When finished:
- Click Create to submit the request.
- Or click Cancel to discard.
- Use filters to organize and search for requests by priority, status, project, or team.
- Switch between Table and Board views to monitor progress.
- Update the request fields as work progresses (e.g., changing status or assignee).
Best Practices
- Always provide a detailed description to avoid back-and-forth clarification.
- Assign requests to the correct team to ensure faster resolution.
- Regularly update the status field to keep everyone informed.
Managing Teams in the Service Desk
The Teams feature inside the Service Desk allows you to organize users into groups for better task allocation, reporting, and collaboration. This ensures that requests are assigned to the right people and departments.
Step 1: Access the Teams Section
- From the Service Desk menu, locate the options at the top of the page.
- Click on Teams.
- The Teams page will open, showing a list of existing teams (if any).
- You will also have the option to create a new team.

Step 2: Create a New Team
To set up a new team:
- Click on the Add Team button.
- A form will appear with the following fields:
Team Form Fields
Name (required):
Enter the team’s name. Choose a name that clearly reflects its purpose (e.g., Support Team, Billing Team, Client Success).Type (required):
Select the type of team from the dropdown:- Department – For internal teams (e.g., IT, Finance, Operations).
- Client – For external-facing teams or groups linked to specific customers.
Users (required):
Add members to the team by selecting them from the user list.
You can add multiple users to ensure the team has the right mix of expertise.

Step 3: Save the Team
- Once all fields are filled, click Create to add the team.
- If you want to cancel, click Cancel to discard the form.
Step 4: Manage Teams
After creating a team, you can:
- View all teams in a list.
- Edit team details such as name, type, or members.
- Remove users or disband teams if they are no longer required.
Best Practices
- Create teams that mirror your company structure (departments, projects, or clients).
- Keep team membership updated as employees join, leave, or switch roles.
- Use descriptive names to make assignment and reporting easier.
Managing Projects in the Service Desk
The Projects feature in the Service Desk allows you to group requests, teams, and rules together for better organization and management. Projects help structure your workflow by connecting specific teams and automation rules to a shared objective.
Step 1: Access the Projects Section
- From the left-hand side menu, click Service Desk.
- At the top of the Service Desk menu, click on Projects.
- The Projects page will open, showing the option to create a new project.

Step 2: Create a New Project
- Click the Add Project button.
- A Create Project form will appear, as shown below.

Step 3: Fill in the Project Form
Complete the form with the following details:
Name (required):
Enter a name for the project.
Use clear and descriptive names such as Customer Support Rollout or EV Infrastructure Expansion.Teams (required):
Select one or more teams that will be linked to this project.
Teams must be created beforehand in the Teams section.Rule (required):
Choose a rule to apply to the project. Rules can automate assignments, escalations, or workflows.Auto Assign (optional):
Check this option if you want the system to automatically assign incoming tickets to available team members.Allow Non-Assigned Users to Open Ticket (optional):
Enable this if you want users outside of the assigned teams to also be able to create requests for this project.
Step 4: Save the Project
- Click Submit to create the project.
- Click Cancel if you want to discard the changes.
Step 5: Manage Projects
After creation, you can:
- View all projects in the list under the Projects section.
- Edit project details such as name, teams, or rules.
- Enable or disable automation options like Auto Assign.
- Delete projects that are no longer required.
Best Practices
- Create projects that mirror business initiatives, product lines, or client portfolios.
- Always link the correct Teams to ensure requests are routed efficiently.
- Use Rules to automate repetitive processes and reduce manual workload.
- Review and update projects regularly to keep them aligned with evolving business needs.
Managing Rules in the Service Desk
The Rules feature in the Service Desk allows you to set service-level expectations (SLAs) for handling tickets. Rules help standardize response times, resolution times, and automated communications, ensuring consistency in customer support and internal processes.
Step 1: Access the Rules Section
- From the left-hand side menu, click Service Desk.
- At the top of the Service Desk menu, select Rules.
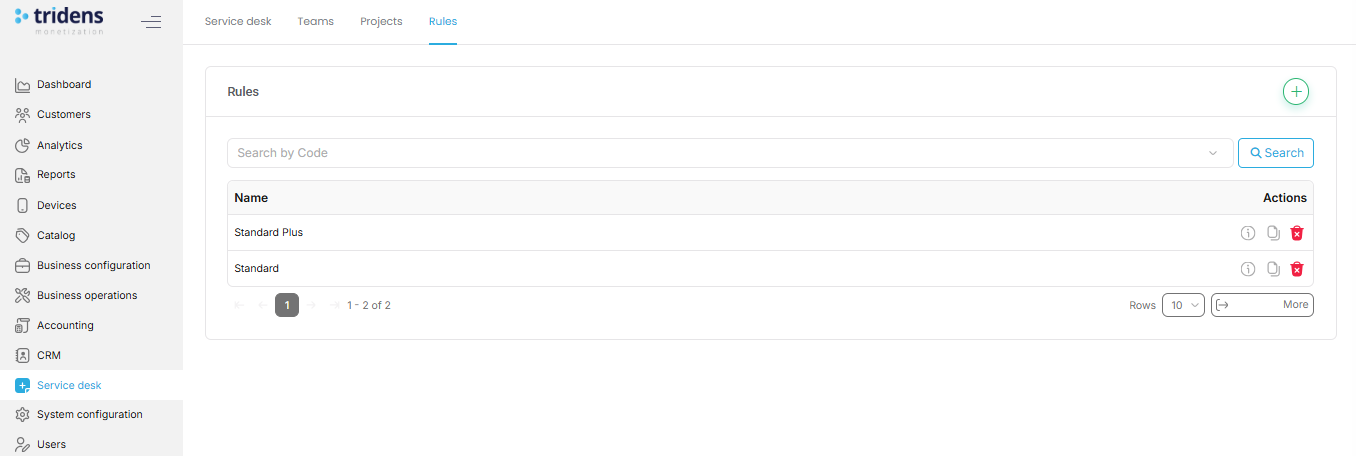
Default Rules Page
When you first open the Rules tab:
- You will see a list of existing rules (if any have been created).
- If no rules exist, the page will display an empty state, prompting you to add your first rule.
- Each rule shows its name, severity, and timing thresholds so you can quickly understand the SLA applied.
Step 2: Add a New Rule
- Click on the Add Rule button.
- The Create Rule form will appear, as shown below.
Step 3: Fill in the Rule Form
Complete the rule form with the following details:
Name (required):
Provide a clear name for the rule (e.g., Critical Issues SLA, Standard Support Rule).Severity (required):
Define the importance of the issue this rule applies to (e.g., Low, Medium, High, Critical).
Severity typically determines how fast a response or resolution is expected.First Response Time (hours) (required):
Set the maximum time (in hours) within which the first response must be provided.
Example: 1 hour for critical issues, 24 hours for low-priority tickets.Resolution Time (hours) (required):
Define the expected time (in hours) to fully resolve the issue.
Example: 4 hours for critical, 72 hours for medium.First Response Message (optional):
Enter an automatic message that will be sent as the first acknowledgment to the reporter.
Example: “Thank you for your request. Our team is reviewing it and will get back to you shortly.”

Step 4: Save the Rule
- Click Submit to create the rule.
- Click Cancel if you want to discard.
Step 5: Manage Rules
After rules are created, you can:
- Edit SLA details (name, severity, timing, or response message).
- Delete rules that are no longer applicable.
- View all active rules in the list to ensure they match your support policies.
Best Practices
- Define separate rules for different severities (Critical, High, Medium, Low).
- Keep first response times short to reassure users that their requests are being handled.
- Use First Response Messages to set clear expectations and reduce follow-ups.
- Regularly review SLA rules to ensure they align with business goals and customer expectations.