Customer Account Page
Category:
Topics in this document:
- Finding customer account
- Onboarding a customer
- Exporting customer information
- Details customer account page
- Overview
- Contacts
- Users
- Payments
- Subscriptions
- Balances
- Bills
- Hierarchy
- Support
- Devices
- Communications
- Activities
- Events
- Reminders
To access the customer account page, open the Menu and click Customers.
The customers list gives you a quick snapshot of all your active and inactive accounts. It is the first page shown when you access the Customers section.
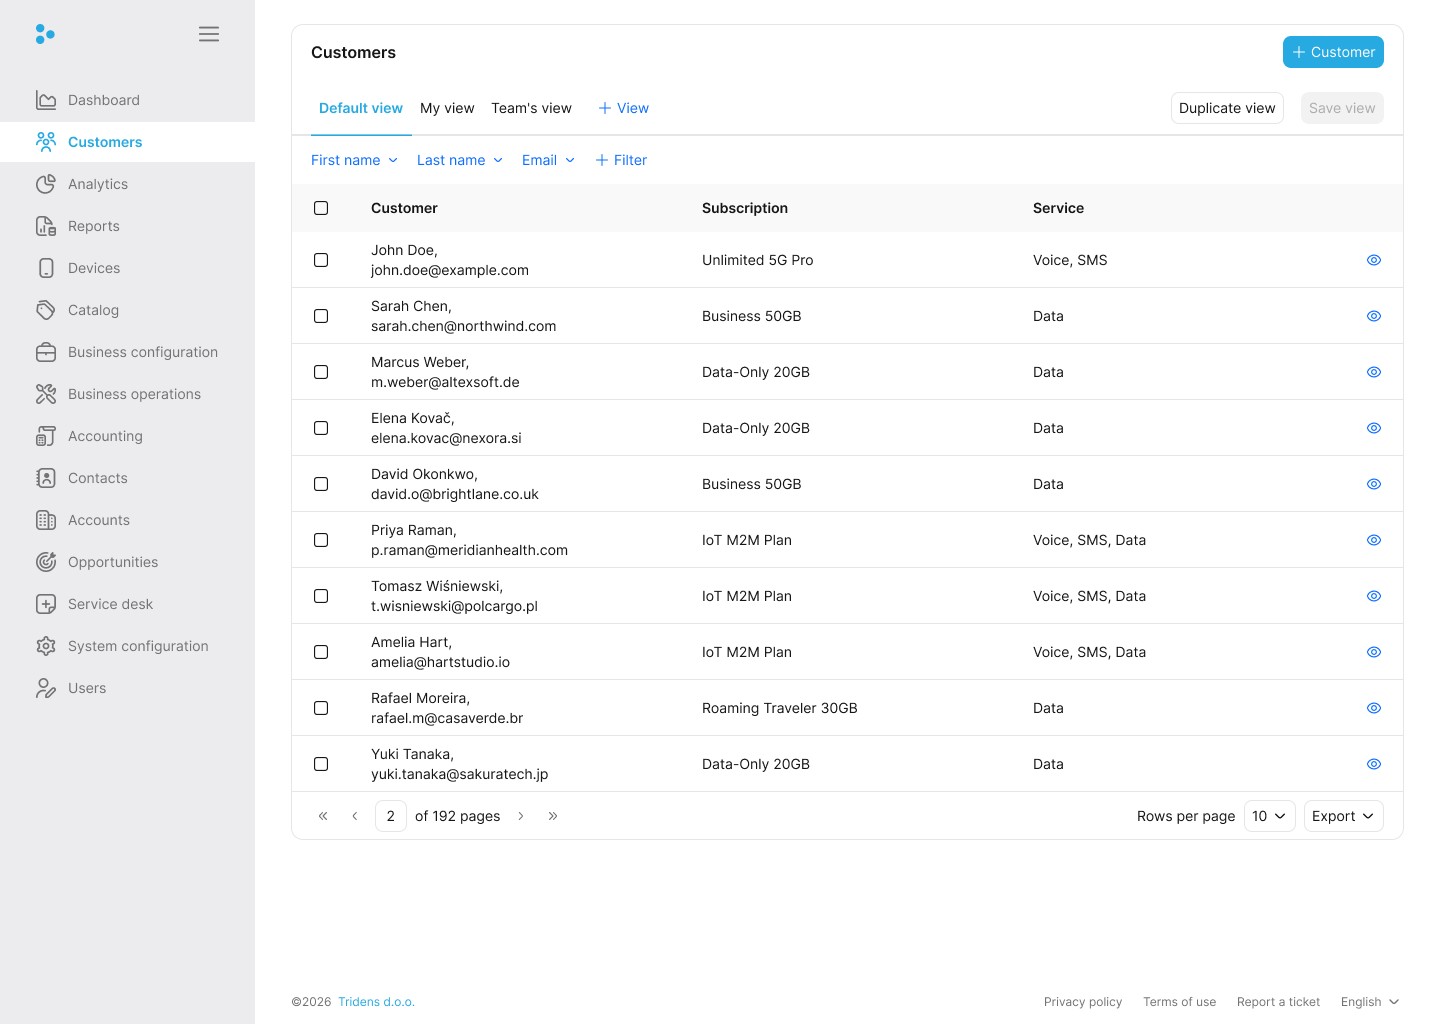
You will see your customers in a tabular format, showing their name, the number of active subscriptions, active services, and a button to view their full details. Use the list to switch views, filter customers, open an account, or export the current page.
From here, you can easily:
Finding customer account
You can search for a specific customer by their full name, email address, physical address, status, customer type, or payment method.
To do this, click Filter on the list page and enter your search criteria. The list updates automatically to show only the matching customers.
To clear your search and view all customers again, click Reset. You can then hide the filter bar by clicking Filter.
Onboarding a customer
Onboarding a customer allows you to create the customer record, billing details, and first subscription in one guided flow.
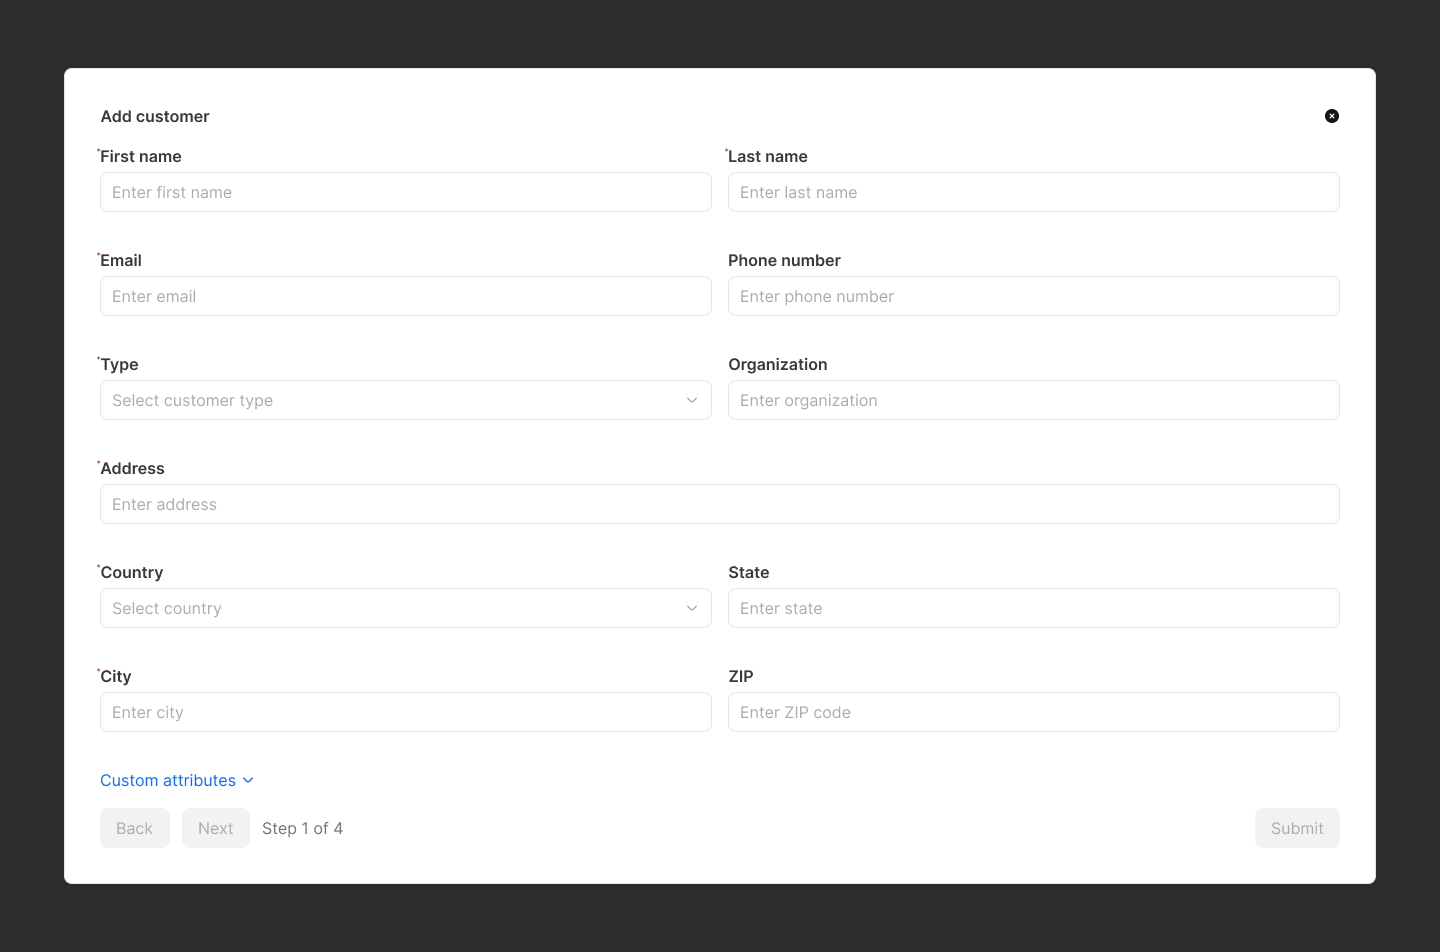
To onboard a new customer, click Create new on the list page. This opens the customer onboarding page, which guides you through four steps:
- Account info section
- Payment info section
- Sharing and hierarchy section (optional)
- Subscription section
Account info section
Start by entering the customer’s basic details: first name, last name, email address, and phone number.
Note:
The customer’s email address must be unique for a particular site.You must also select a customer type, such as commercial or residential. This helps you segment customers for analytics, reporting, and bulk business operations. For more information, see Customer types.
Provide the required address details. Accurate addresses help taxation and invoice generation work correctly. Custom attributes configured for your system will also appear here as optional fields.
Payment info section

Choose how the customer will pay for their services: via invoice, credit card, or direct debit.
- Invoice: No extra payment details are required unless the billing address differs from the main address.
- Credit Card: The system stores only a reference token through your configured payment gateway and basic owner information for secure automatic deductions.
If a direct debit is selected, insert the following information about the customer:
- The mandate identification
- The mandate date of signature
- The BIC
- The IBAN
Note:
The customer’s tax identification number can be included under any payment method. It is useful when integrated with a taxation gateway in Monetization.
The value should represent the customer’s value-added tax (VAT) number and can be added to the invoice. For example, if a customer is a company, their VAT number can be populated and shown on the invoice PDF.
Sharing section (optional)
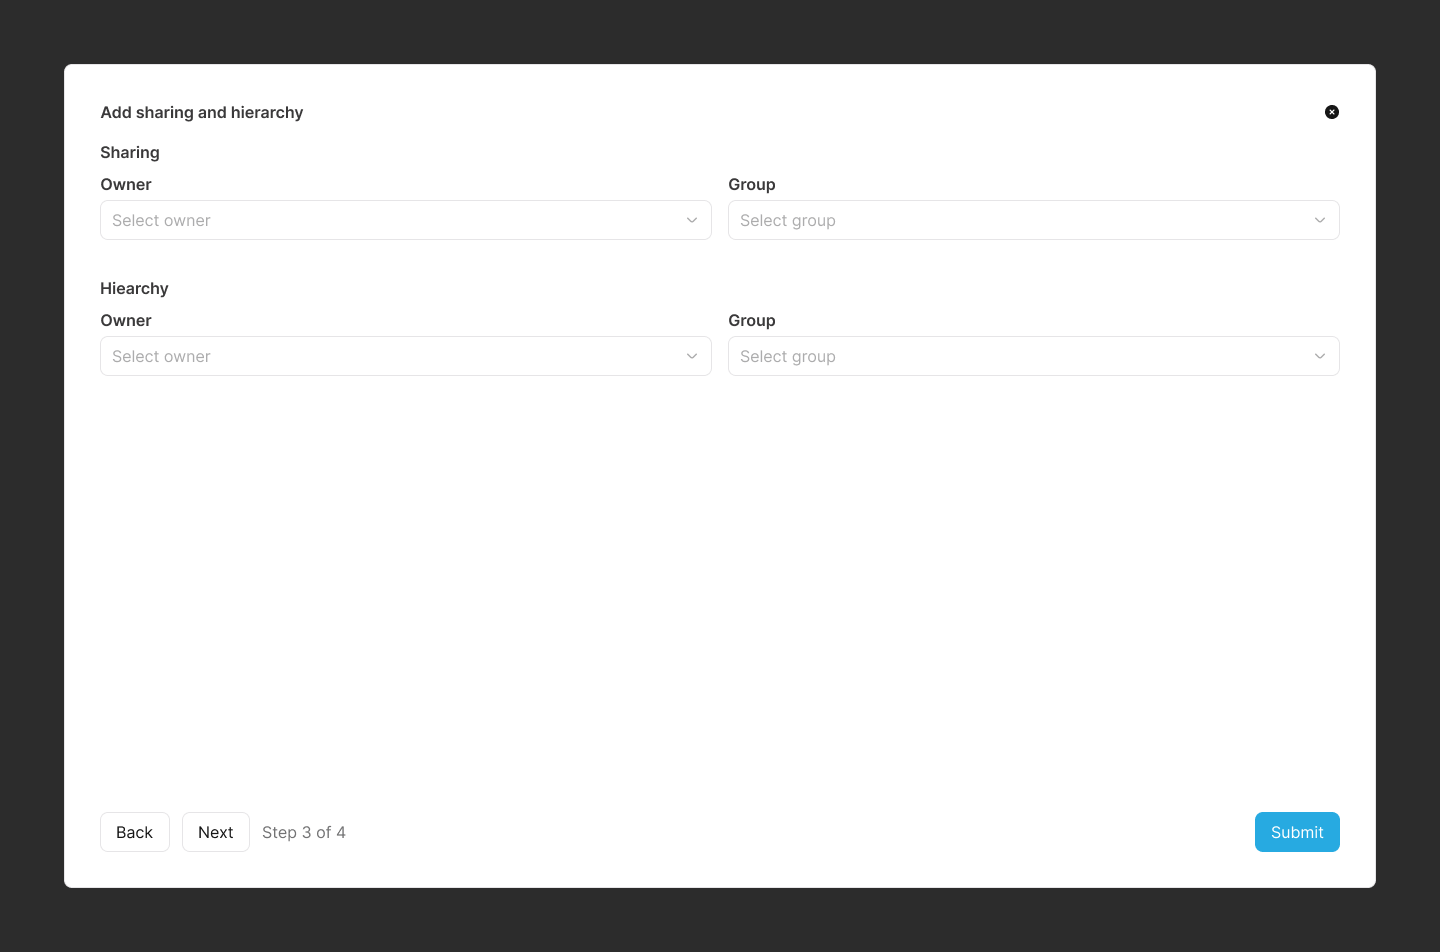
Use this step if the customer should belong to an existing sharing group. Sharing lets multiple customers consume the same resource pool in real time, for example a family plan with one shared data allowance.
To add the customer as a member of an existing sharing group, select the owner account and then choose the group.
Note:
You can only assign the customer as a member during onboarding. If the customer should own the group, create it later from the Sharing tab on the account details page.Hierarchy section (optional)
Use this step for corporate or organizational billing, where a parent account pays the bills of child accounts.
Unlike Sharing, charges are not transferred in real time. At the end of the billing cycle, the child’s invoice is transferred to the parent account for payment.
Select the owner account and then choose the hierarchy group to add the customer as a member.
Subscription section

Information:
Use this step to attach a plan from your catalog and create the first subscription.Select a payment type. The billing profile linked to the subscription must use the same payment type.
Also select a resource; this refers to the monetary resource or currency used for billing.
Select the interval; this defines how often the customer is billed, for example monthly, weekly, or yearly.
Note:
The interval is configured in Monetization under Business configuration Charging Event Types. For more information, see Event types.Choose the billing day; it specifies the day of the month the customer will be billed. This is used when Monetization sets the customer’s billing cycle. For example, the customer can be billed on the first day of every month.
Optional promotion codes can be coupons or vouchers. These codes let you apply special offers.
Information:
Typically, only coupons are used during this section.The code is generated in Monetization, under Business configuration Voucher for vouchers, and under Catalog Packages Coupons for coupons.
Select a plan for the customer. A plan is the top-level object in the offering catalog. It consists of bundles, and each bundle can contain products and discounts. A plan is created under Catalog Packages Plans.
Note:
A plan is what your customers subscribe to consume a service(s) or to use a product resource(s). For more information, see Plans.After you choose a plan, the bundles in that plan appear below it, with the products listed in a table under each bundle.
You can edit the quantity, value, and validity period for each product.
Information:
The product value does not necessarily mean the product’s price because some can impact other balances—for instance, a grantor product for free 10 MBs. However, the value will represent the price if it is a regular product.Other product details, including the name and type, are also shown. Some products are optional, so you can decide whether to include them by selecting Purchase.
Service products must include a service identifier, either as a string or a device already configured in Monetization. A service identifier is a unique ID for one customer on that service, for example a mobile phone number.
Note:
The All set and Not set indicators make it easy to see where a service identifier is still missing.You can assign a service identifier at the plan level instead of adding it to each product. To do that, enter it in the Service identifier field on the plan.
Note:
Monetization can only continue once there are no Not set indicators left.Information:
To include additional bundles on the subscription, click Add bundle.Review the subscription details before you click Submit. Monetization creates the first billing profile automatically from the payment type and billing interval you selected.
Exporting customer information
You can export your visible customer list to a CSV spreadsheet by clicking CSV on the list page. The export includes their name, email address, subscriptions, and services.
You can also print the list by clicking Print, or copy the data to your clipboard by clicking Copy.
Note:
The export, print, and copy actions only apply to the current page of customers you are viewing.Details customer account page
Under list customers’ account page, to see the full details of a particular customer account, click Details. This will lead you to the details customer account page.
The details customer account page is organized into 14 tabs:
- Overview
- Contacts
- Users
- Payments
- Subscriptions
- Balances
- Bills
- Hierarchy
- Support
- Devices
- Communications
- Activities
- Events
- Reminders
Account Overview
Use the Overview tab to review the customer at a glance.
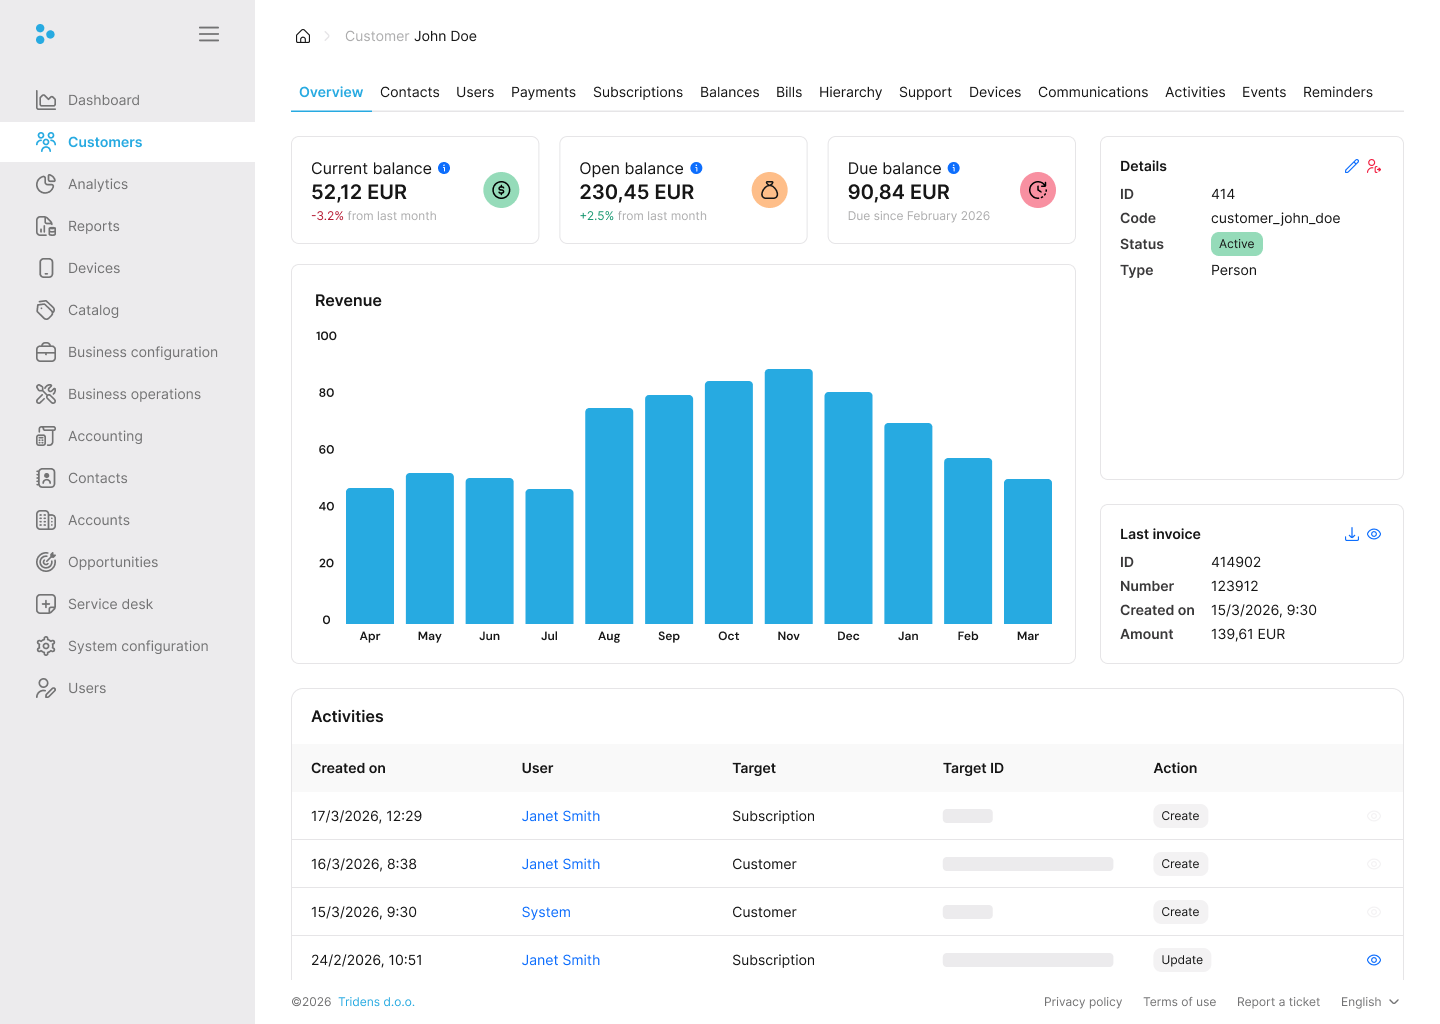
Here, you can see the customer ID, status, type, current balance, open balance, due balance, revenue chart, and latest invoice. The activity log below shows recent actions on the account.
From here, you can:
- Edit account information: Update the customer type or custom attributes.
- Close account: Deactivate the customer.
Edit account information
To edit the account information, click Edit account information. Only the customer type, status and custom attribute can be edited.
Close account
To close a customer account, click Close account. Closing an account is almost the same as deleting it; however, it does not get deleted immediately. A separate background job does the actual deletion after an account has been closed for a predefined period.
Information:
By clicking Close account, Monetization deactivates the accounts that do not have any active subscriptions or purchases. Deactivated accounts are automatically closed and removed after a configurable period.
Note: A customer with the status of inactive cannot purchase a product or subscribe to a plan.
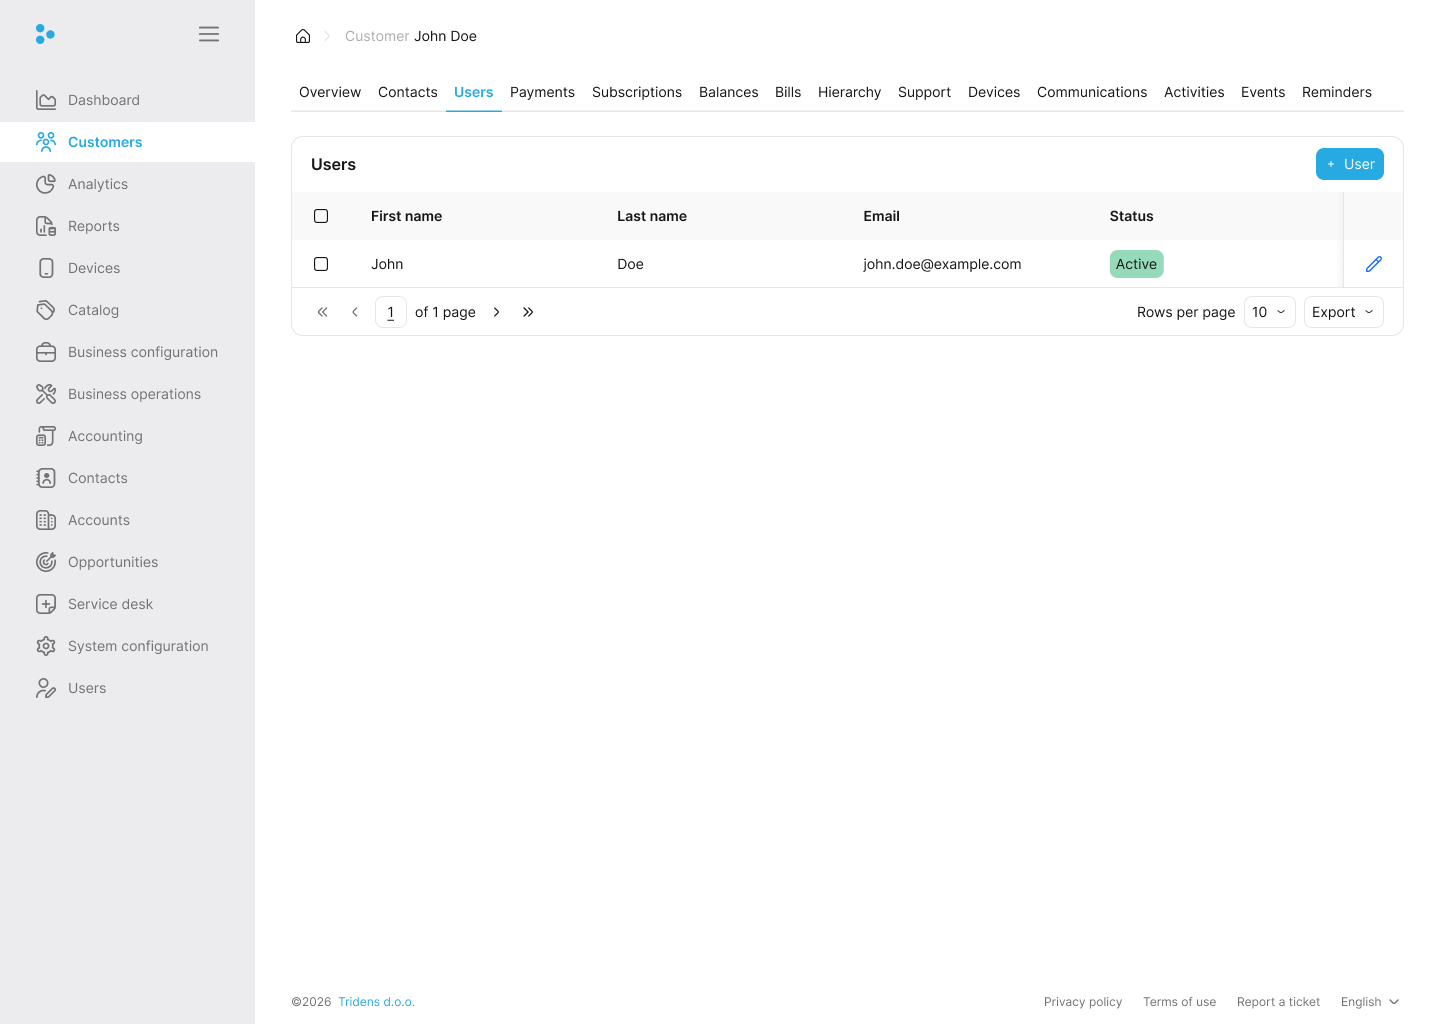
Users
Use this tab to manage the customer’s login credentials for the self-care portal, if it is enabled. Without a user account, the customer cannot sign in to view balances, consumption, or pay bills on their own.
Note:
The user information section is only available if the self-care portal is enabled under the site environment configurations. For more information, see Sites.After you onboard a customer, you can create user information to give that customer access to the self-care portal.
Information:
The self-care portal is available either as a web or mobile application.Note:
Customers without user information cannot access the self-care portal.A single action can be performed for customers without user information.
Create user information
To create a user information, click Create user. The following input fields are required:
- First name
- Last name
- Email address
- Password
- Password confirmation
The customer’s user information can also be enabled or disabled. To achieve this, use the Enabled toggle switch.
Information:
Disabled user information means inactive information, which implies the customer will not be able to access the self-care portal with the user information.After successfully creating the customer’s user information, the following functionalities are accessible:
- Delete user information
- Edit user information
- Request user verification email
- Request user password update
Note:
Customers must verify their email addresses before they can access the self-care portal. For more information, see Request user verification email.Delete user information
To delete the customer’s user information, click Delete user. Once deleted, the customer can no longer access the self-care portal.
Edit user information
To edit the customer’s user information, click Edit user. The information filled out under the create user information section can be edited.
Request user verification email
Before a customer can access the self-care portal, their email address must be verified. To achieve this, click Request user verification email. Once clicked, a user verification email will be sent to the customer.
Request user password update
Requesting a password update will send a user update password email to the customer, or the customer will be prompted to change their password when they log in to the self-care portal. To achieve this, click Request user password update.
Contacts

This tab shows the contact details captured during the onboarding process. It includes the first name, last name, email address, phone number, organization, address, country, state, city, and ZIP code.
Each contact record also includes a tag so you can distinguish one contact from another.
For example, if a customer has more than one contact record, the tag helps you target the right email address.
Note:
The tag pattern can be configured, but Primary, Secondary, and so on is a common convention.Three actions can be performed under this section:
Add contact information
To add another contact information for the customer, click Add contact information. The input fields remain the same as when the initial contact information for the customer was inputted.
However, in addition, include a tag, which can be used to quickly refer to the contact information in other parts of Monetization.
Edit contact information
To edit the contact information of the customer, select the appropriate contact information tag, then click Edit contact information.
Delete contact information
To delete the contact information of the customer, select the appropriate contact information tag, then click Delete contact information.
Note:
Deleting all the customer’s contact information in Monetization is not allowed: there must be at least one contact information.Payments

Use this tab to review and update the customer’s billing details. It includes the billing address, tax identification number, and payment method.
This tab has two subtabs:
- Transactions
- Billing details
Use Transactions to review charges and payments by date. Use Billing details to update the customer’s payment method or billing address.
Edit payment information
To edit the payment information, click Edit payment information. You can switch between invoice, credit card, and direct debit, change the billing address, and add or remove a tax identification number.
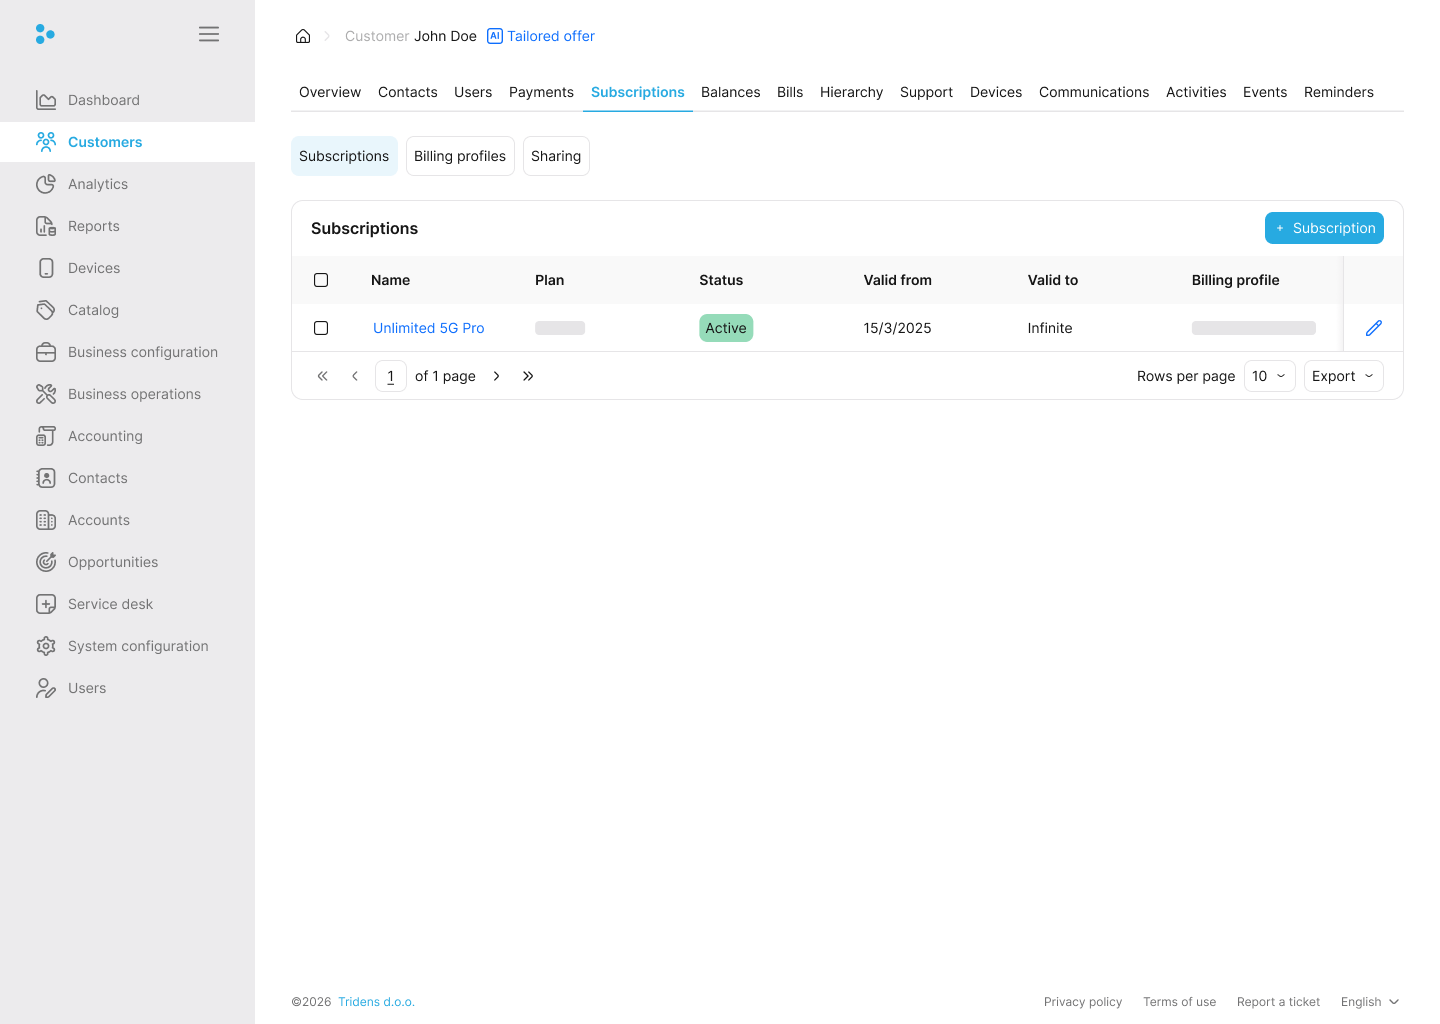
Subscriptions
Use this tab to review the customer’s subscriptions, billing profiles, and sharing setup. The top navigation lets you move between Overview, Bundles, Balances, Notifications, Events, and Services.
Note:
A subscription links the customer to a plan from your offering catalog. Each customer can have an unlimited number of subscriptions.Information:
Customers have billing profiles, billing profiles have balance groups, and balance groups are connected to subscriptions.Adding subscriptions
To add a new subscription, click Add subscription. Select a balance group and a plan. You can also apply promotion codes such as coupons or vouchers.
Information:
Typically, only coupons are used during this section.Note:
If you want to create a balance group while adding a new subscription, click Add balance group and then choose the billing day, payment type, and interval.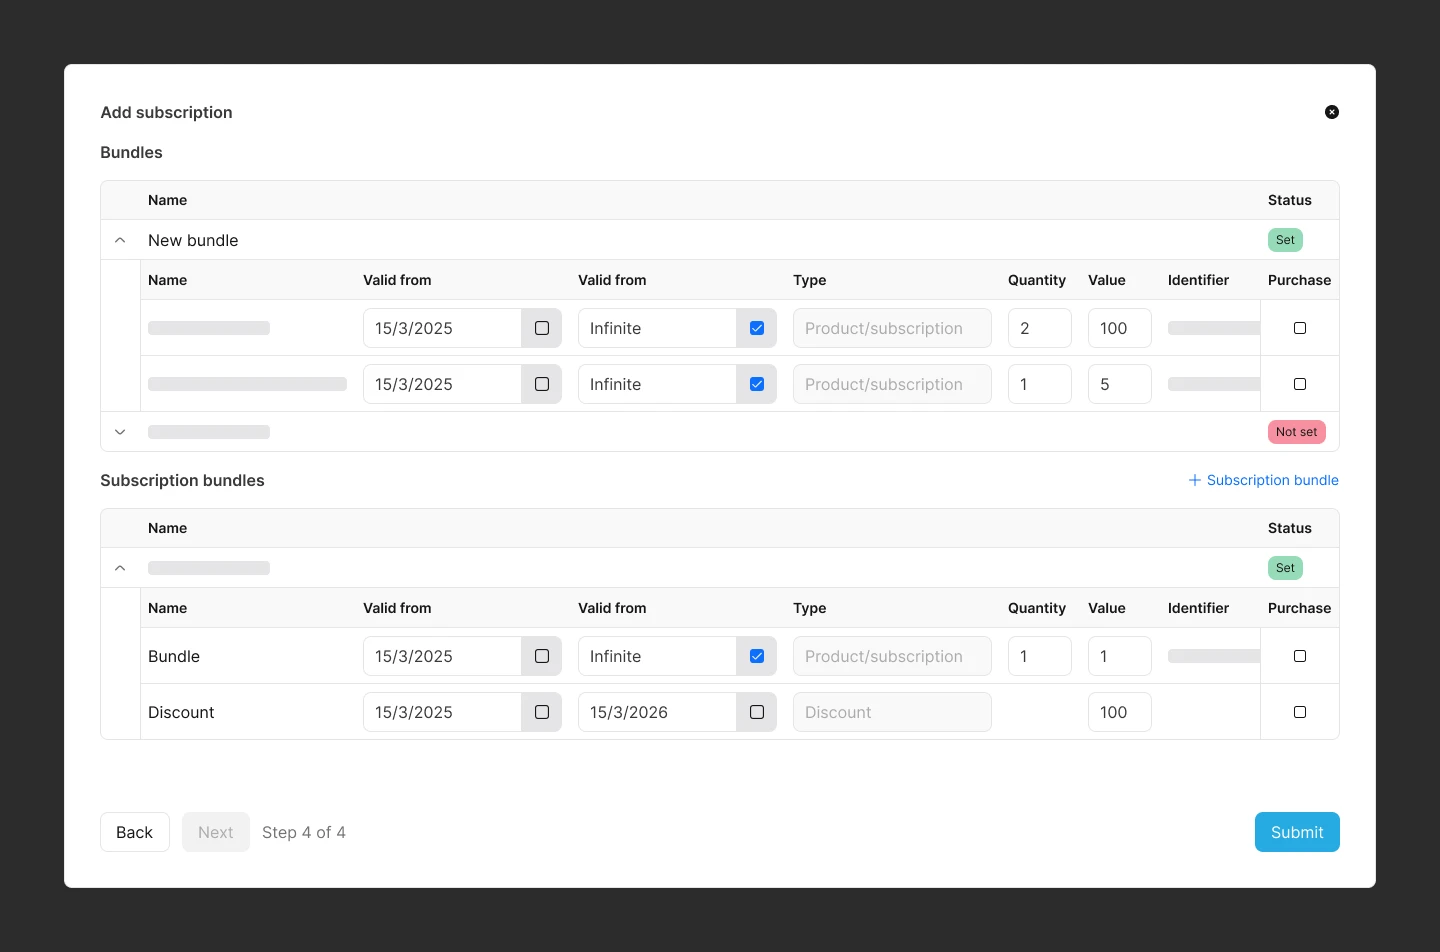
The subscription page is split into these tabs:
- Overview
- Bundles
- Balances
- Notifications
- Events
- Services
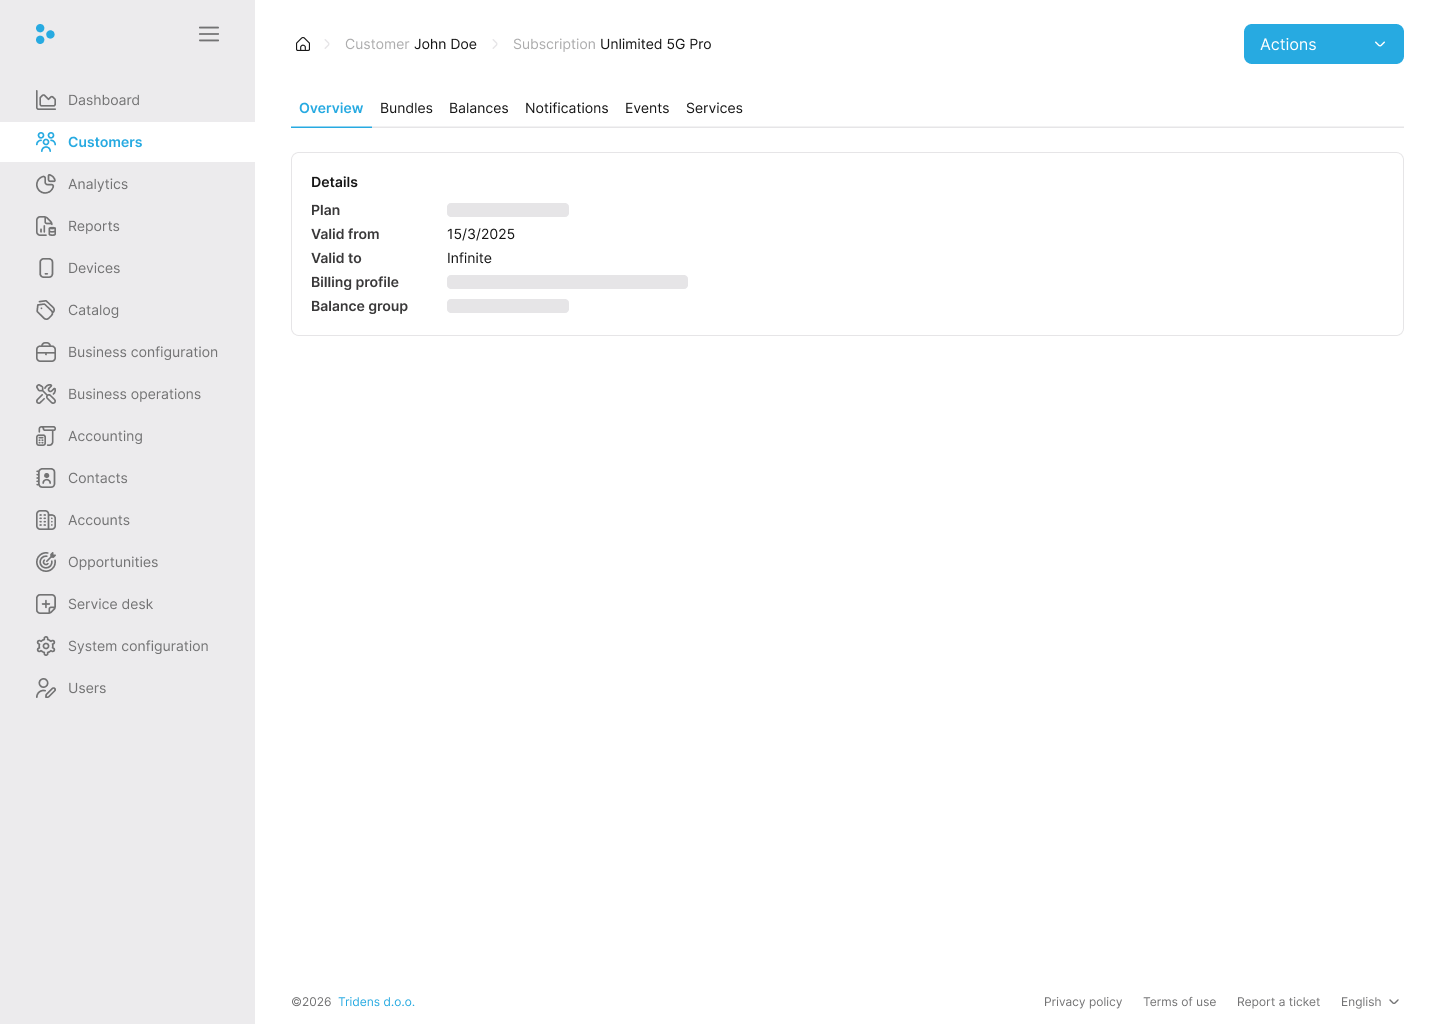
The Overview tab shows the current plan, validity period, billing profile, and balance group.
Use the Actions menu in the top-right corner to:
- Apply voucher code
- Add bundle
- Cancel the subscription
- Start plan transition
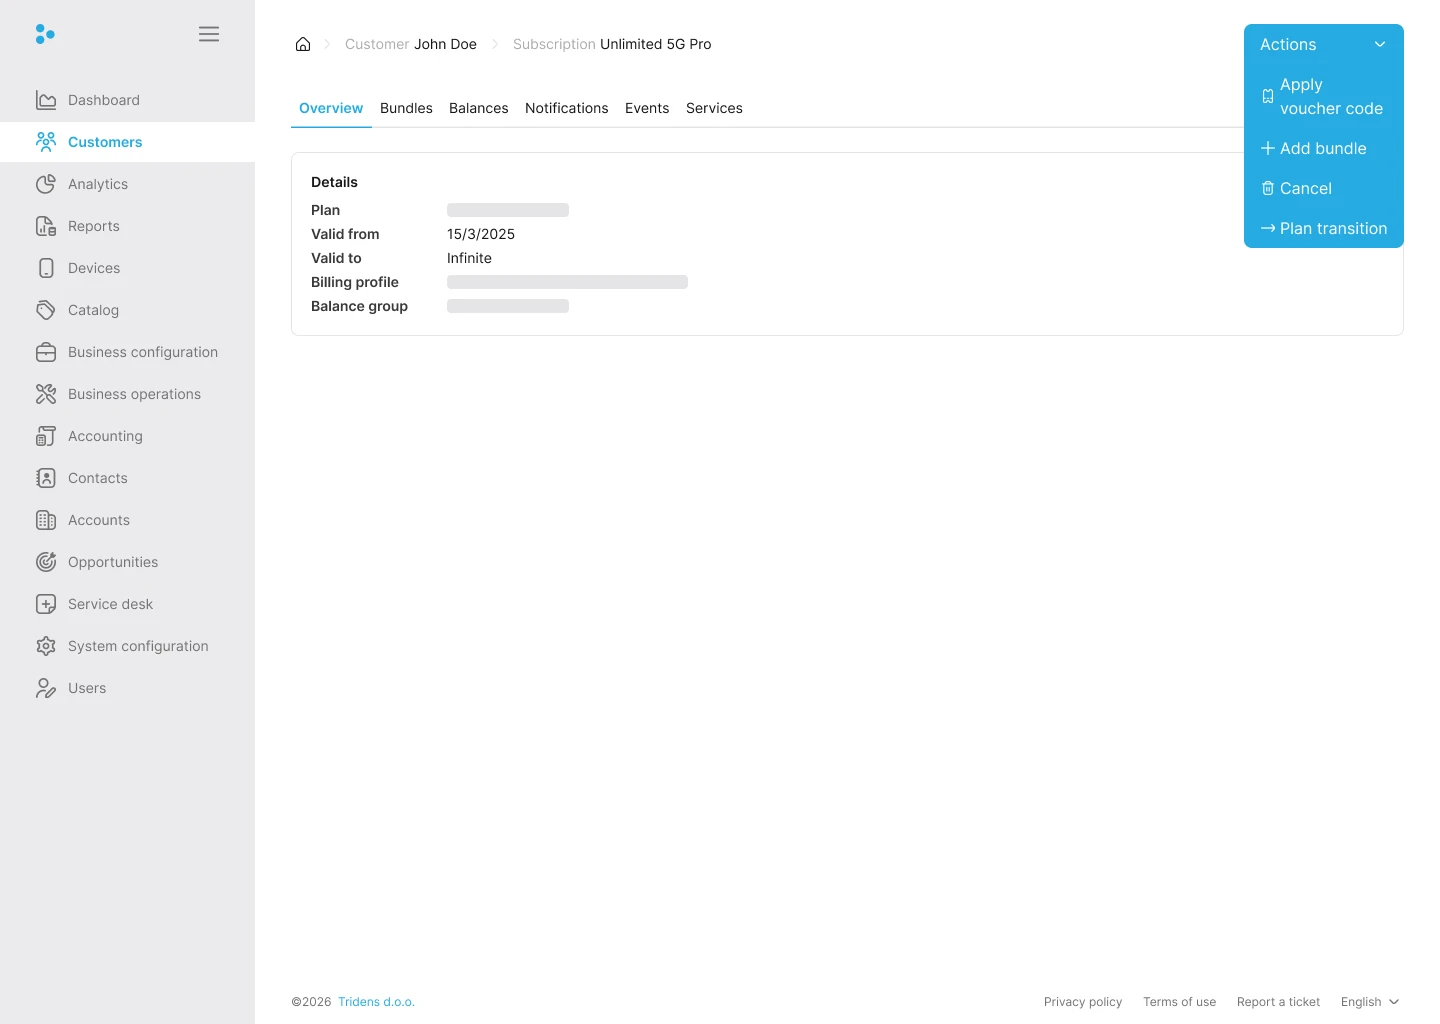
Add-on bundle
On each subscription, you can buy additional bundles on top of the plan. Select Add bundle from the Actions menu, or open the Bundles tab and choose the bundle you want to purchase.
The bundle picker shows the validity period and the products included in the bundle. For each product, you can review the quantity, value, identifier, device, and whether it should be purchased.
Information:
The product value does not necessarily mean the product’s price because some can impact other balances—for instance, a grantor product for free 10 MBs. However, the value will represent the price if it is a regular product.Some products are optional, so you can decide whether to include them by selecting Purchase.
Note:
Service products must include a service identifier, either as a string or a device already configured in Monetization. A service identifier is a unique ID for one customer for that service—for example, a mobile phone number.You can also include optional promotion codes to give the customer a special offer. These can be coupons or vouchers.
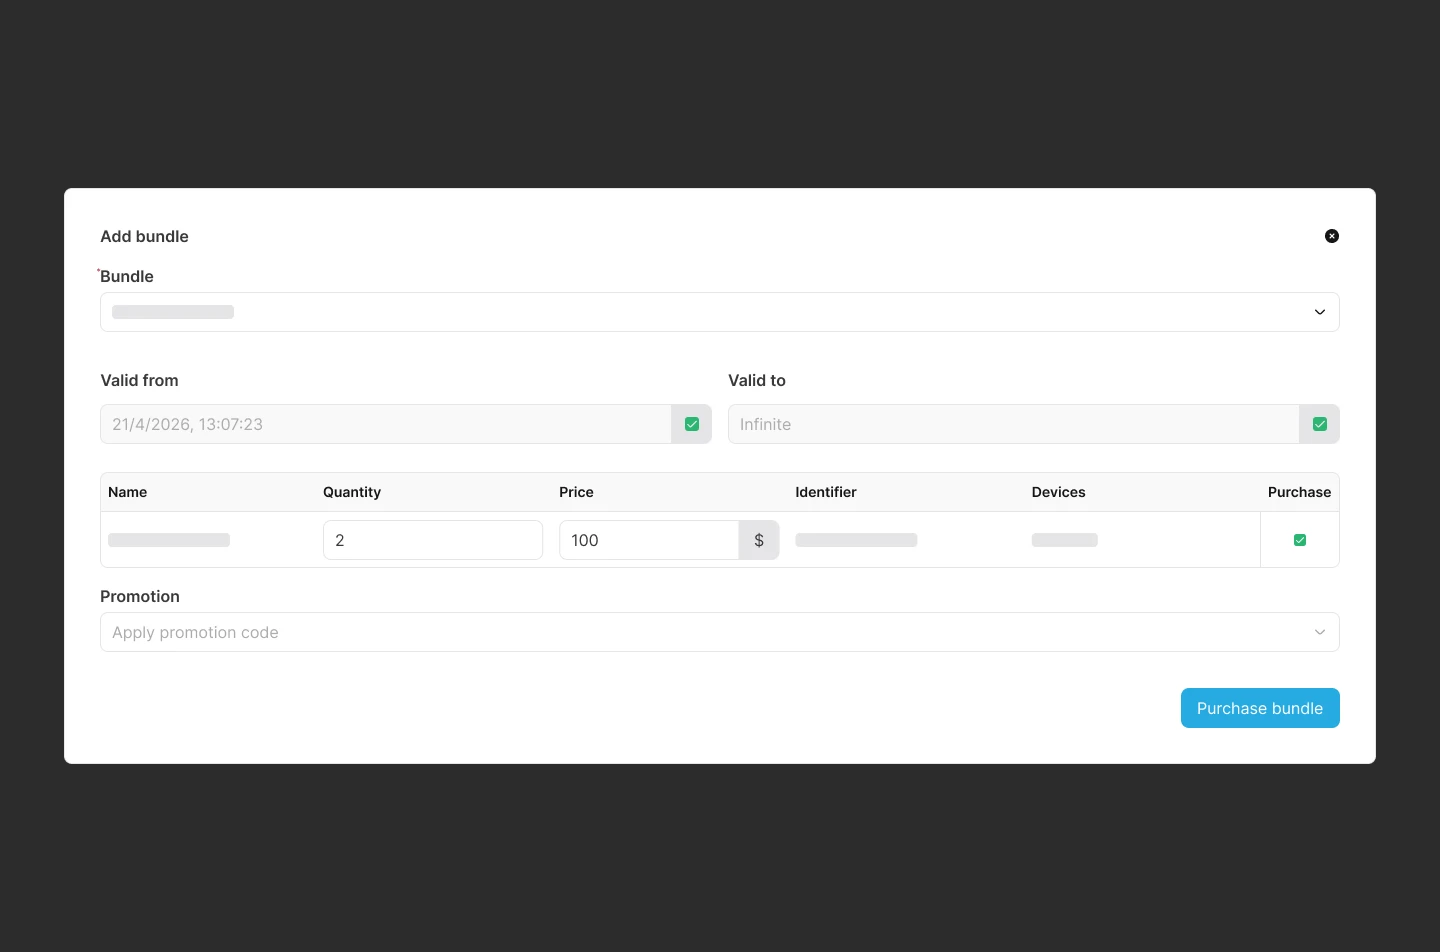
Use Purchase bundle to confirm the add-on after you review the selected products and their purchase settings.
Information:
Typically, only coupons are used during this section.Editing and canceling products
Under a subscription, each product in the bundle can be edited or canceled. To do that, click Edit product or Cancel product.
Note:
Only the service identifier and validity period can be edited for the product.To apply a voucher on a subscription, click Use voucher and enter one or more voucher codes. Monetization applies each voucher to one bundle purchase.
Information:
The voucher code is generated in Monetization, under Business configuration Voucher.To upgrade or downgrade the customer to another plan, click Plan transition, choose the new plan, and configure the validity period.
Note:
The migration does not happen immediately. Instead, it will run at a specific period configured under the plan transition job.To cancel a subscription manually, click Cancel subscription.
Note:
Subscriptions can be closed manually by clicking Cancel subscription or automatically by a purchase verification job, after which they become invalid, and their products no longer renew.
Some subscriptions have predefined duration terms; for example, a two years commitment contract.
There are three subsections under each subscription:
Services
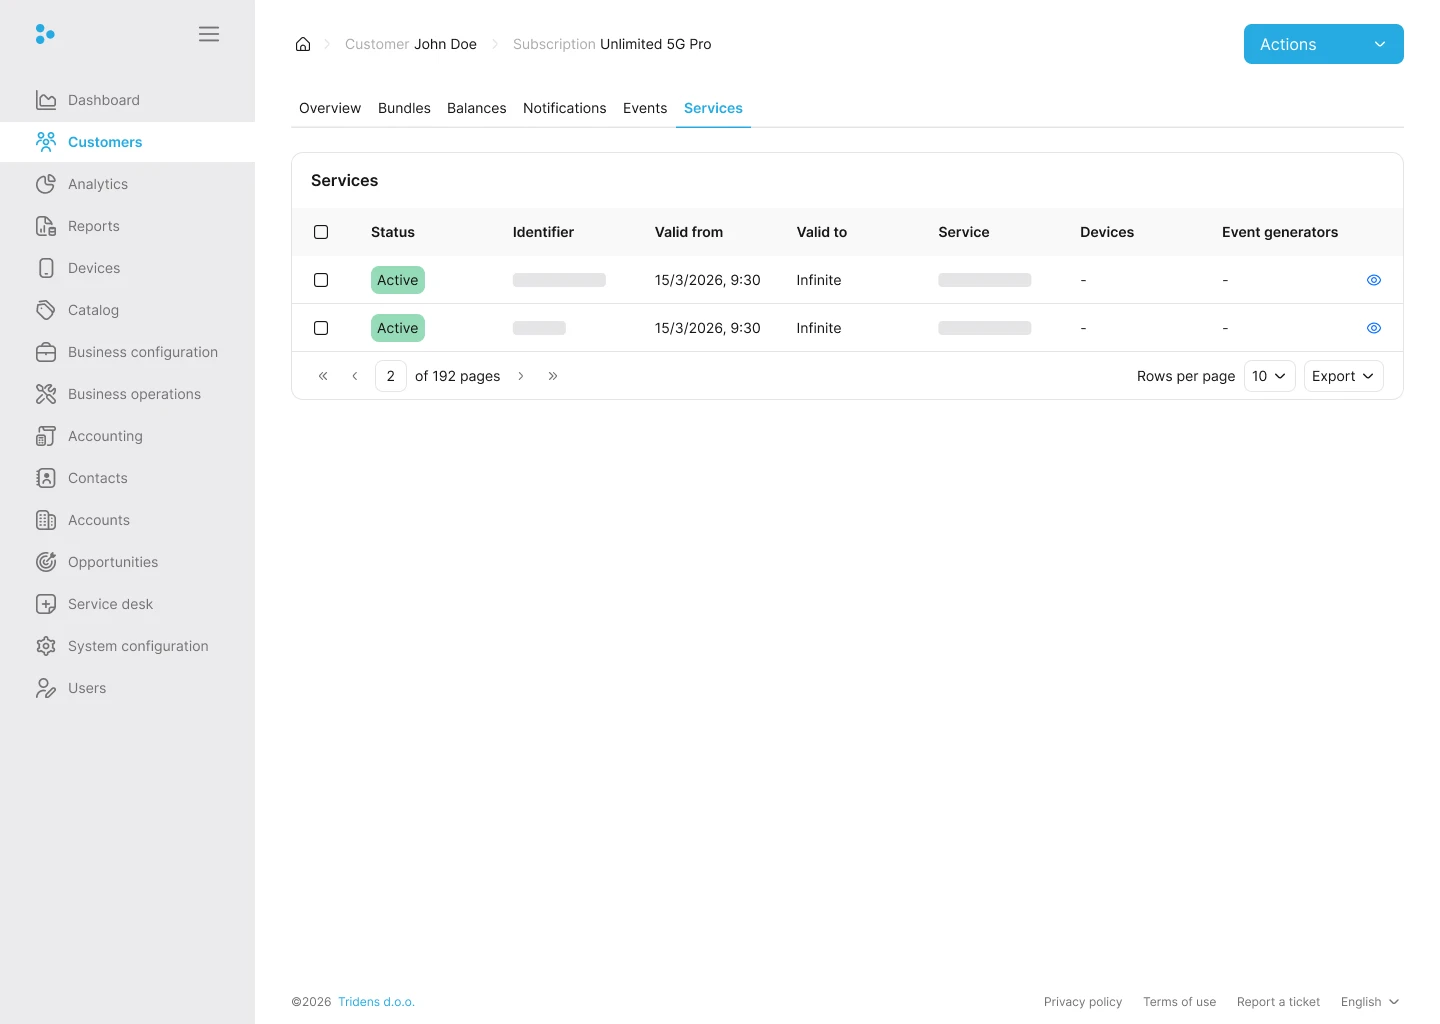
A service enables a customer to receive usage or consumption-based events. For instance, a voice call service created in Monetization will allow voice call events to be processed. The service can then be rated based on the service event parameters and rate plan. In Monetization, a service type represents a service.
Note:
In this section, Monetization shows only the service(s) that come with the customer’s purchased product.Information:
Each service has a unique identifier for one customer and allows customers to receive usage events intended for that service type.Services are configured under Business configuration Service design Service types. For more information, see Service types.
The Services tab shows the service status, identifier, validity period, service name, devices, and event generators. Use the eye icon to open a service row and review its details.
Note:
A service can have a status of active, inactive, or released. The service with a released status can be assigned to another customer, which will then be transferred to the new customer as an active service. To achieve this, specify the same service identifier for the new customer.
For example, a phone number that is no longer in use and has been quarantined for long enough to be reused by another customer.
Service Identifier Definition
The only restriction for alphanumeric service identifier is that it needs to be unique among the service entries. It can be any alphanumeric character string.
While customers are onboarded by the mobile application, identifier is assigned by the instantaneous timestamp, so if you are doing an onboarding in alternative way by the web dashboard, you can use the consistent principle by taking the current timestamp value from the Epoch Converter. Otherwise, you can apply your own identification definition rules.
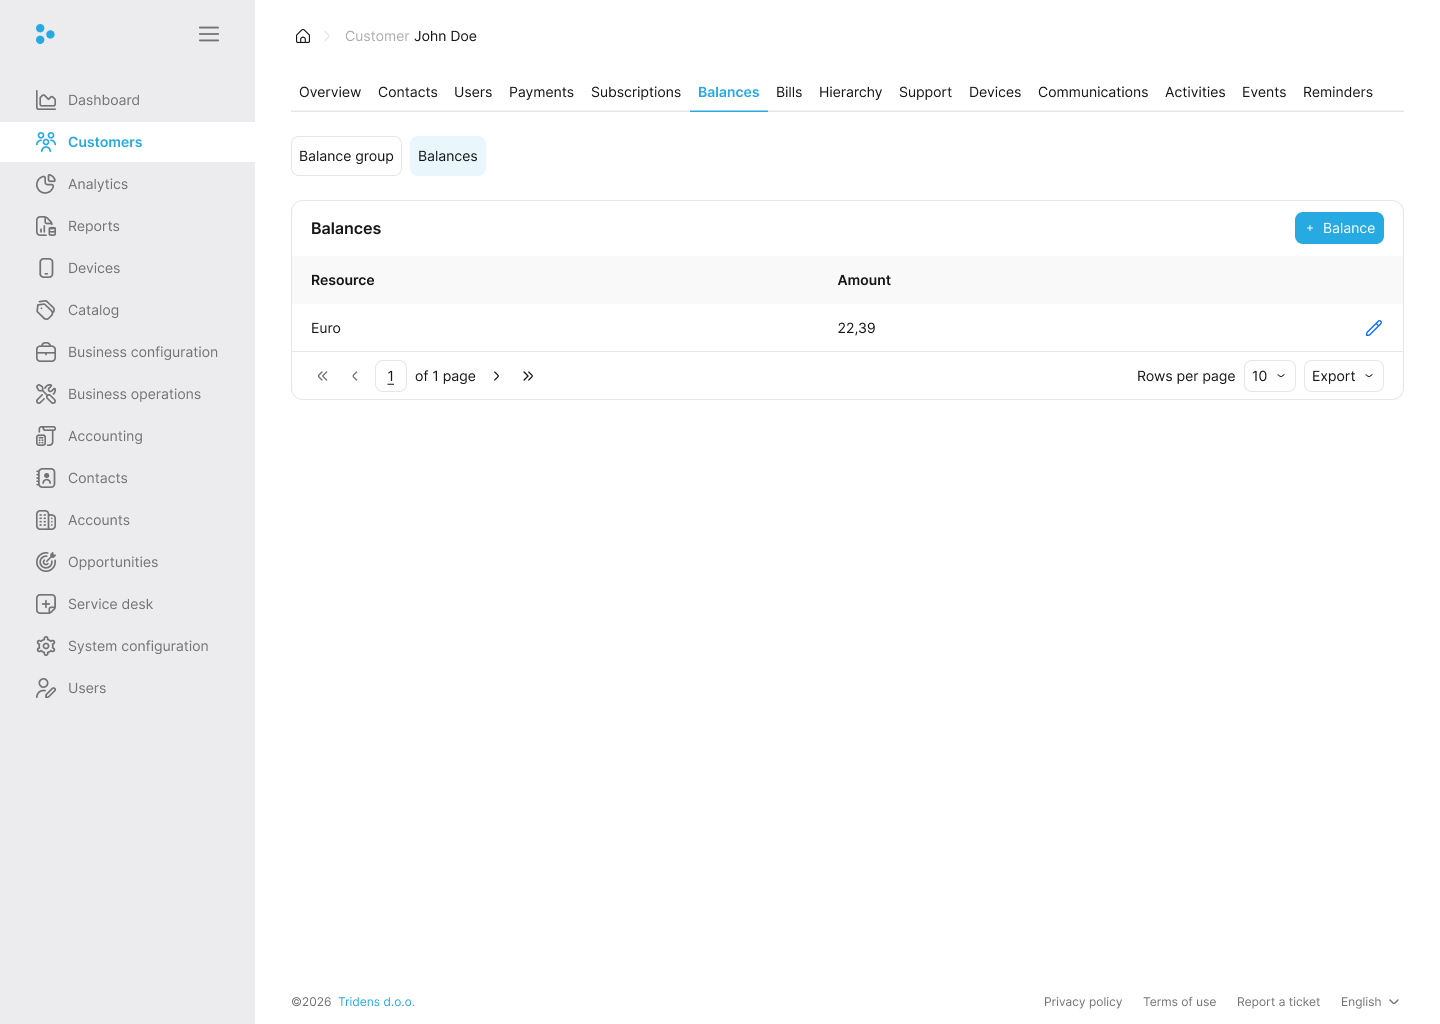
Balances
Balances and notifications
Resources depicts which balances can exist in Monetization. Based on the configured resources, a balance for that resource can be created in a customer’s balance group.
Resources also have different balance consumption order configured. This dictates how the balance of each resource should behave when impacted: if multiple balances of the same resource exist.
Balances
A subscription is linked to a balance group. This section shows the total valid amount of the balance of each resource from the balance group.
Information:
The total valid amount means the amount in which the validity period is still active.Note:
Multiple subscriptions can be linked to the same balance group. Hence, the balances will capture the total valid amount of balance of each resource from the balance group, which could be that of many subscriptions and not just one subscription. However, you can link a single subscription to a balance group.Balances track what the customer owes or what they have left to consume.
- Positive Balances: Typically represent usage charges (e.g., they consumed data and now owe money). They will be billed for this amount at the end of their cycle.
- Negative Balances: Represent prepaid credit or free resources. For instance, if they prepay $50 or receive a 10GB free allowance, it shows as a negative balance. As they consume the service, the balance moves closer to zero.
- Monetary vs. Non-Monetary: Balances can track currency (money) or other units (like Gigabytes, Minutes, or tokens).
Note:
There must be at least one monetary resource for one balance group. The monetary resource is required because every billing profile needs to have a monetary resource specified for Monetization to know which resource balance in the balance group to treat as money when applying charges to the bill/invoice.To view the balance details of each resource in the balance group, click on the resource name. It shows the validity period, resource name, amount, and when the resource balance was created, all in a tabular format.
Note:
Under the balance details for each resource, there could be more than one balance detail.To perform adjustments on the resource balance detail, under Actions, click Adjustment. The amount and bill item can be modified. Furthermore, tax can be included. To achieve this, enable the with tax toggle switch and provide the tax, tax supplier, and general ledger.
Creating a balance
Information:
Balances in Monetization are impacted by purchasing products, discounts, or service usage events (usage-based charges). Once a charge occurs, Monetization will find the appropriate balance to impact or create a new one if no valid balances exist. The impact will either increase (Debit) the balance or decrease (Credit) the balance.You can also create a resource balance manually in Monetization. To achieve this, click Create a new balance. Select the resource, insert the amount, and specify how the balance should be represented (either as a positive or negative charge).
For a negative charge, select Credit; it means the customer is getting something (lowering the charge). For a positive charge, select Debit; it means the customer is being charged (that is, increasing the charge).
Furthermore, the validity period for the resource balance can be changed from the current cycle to another date or an infinite date. The current cycle means the resource balance will only be valid during the customer’s current billing cycle.
Notifications
A notification occurs as a result of the customer bridging a threshold that is configured for a resource by a credit profile through a credit limit. This section shows the time the notification was triggered, the type of notification, the breached threshold value, and the resource.
Customers can be alerted via email or text message that they have breached a threshold. Third-party APIs can also be called via JSON requests to notify other components in Monetization.
For instance, suppose a customer has some free MBs allocated; if the customer has consumed almost all their free MBs, a text message/email can be sent to them urging them to purchase an add-on.
Alternatively, suppose the customer payment type is configured to be prepaid and consumes all their account credit. In that case, a text message/email can be sent to them stating that the account is running low and they need to top up to continue using the services.
Billing profiles
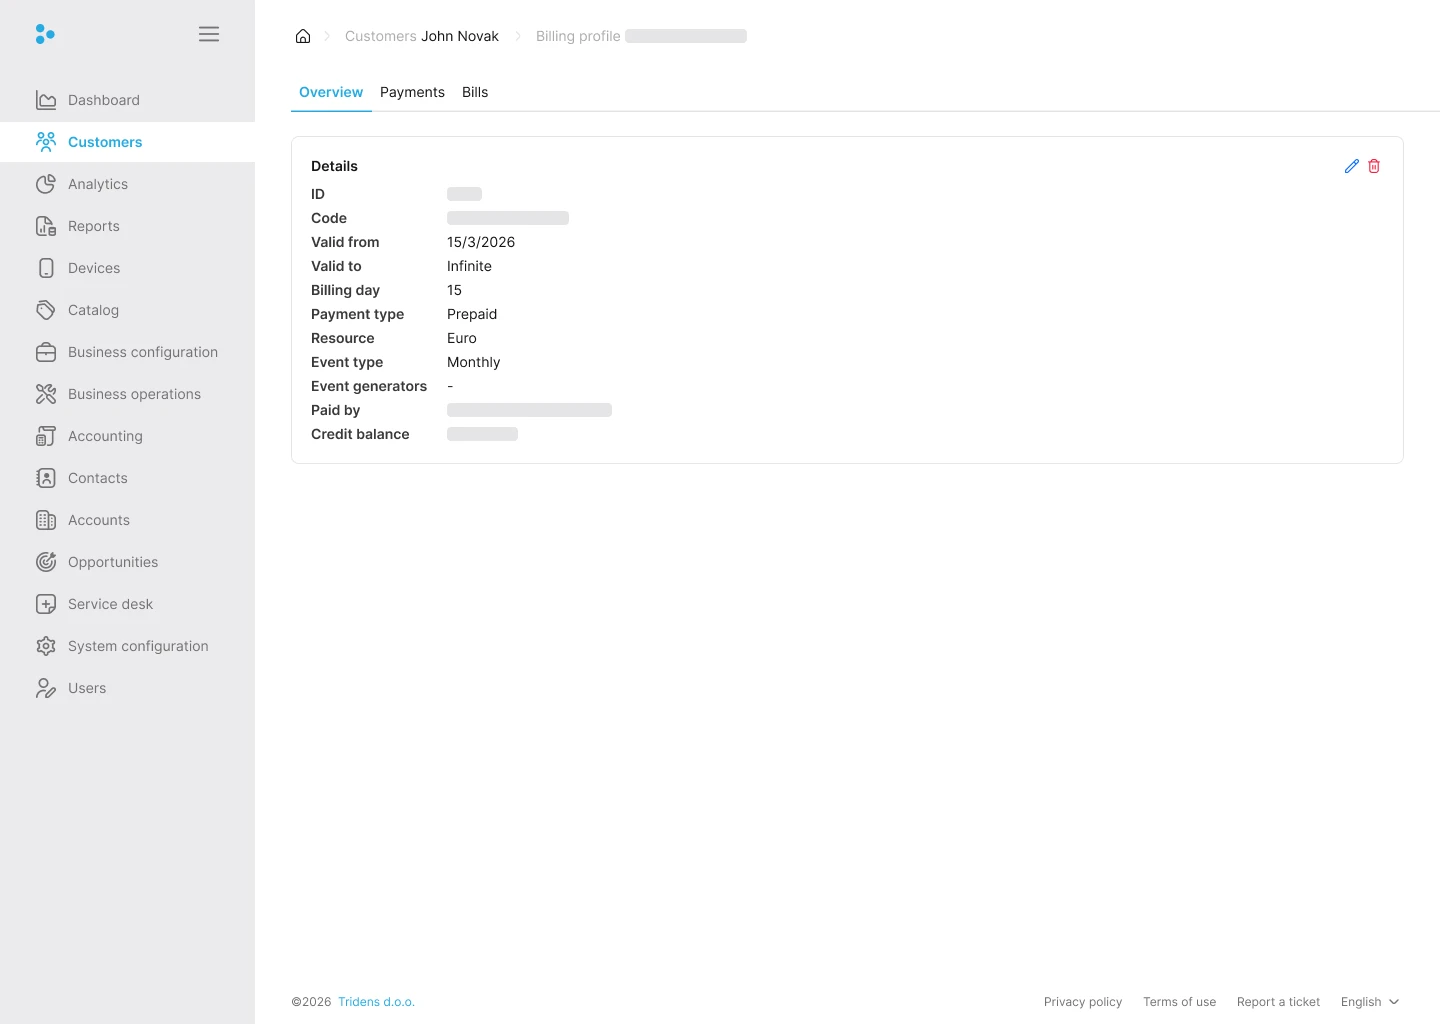
A billing profile defines how the customer is billed. Use the Overview tab to review the setup and the Payments and Bills tabs to manage payment details and bills.
The Overview tab shows:
- ID
- Code
- Valid from
- Valid to
- Billing day
- Payment type
- Resource
- Event type
- Event generators
- Paid by
- Credit balance
Note:
Use the pencil icon to edit the billing profile and the trash icon to delete it when the profile is no longer needed.To create a new billing profile, click Add billing profile. Provide a name, payment type, monetary resource, event type (represented by interval), billing day, and validity period.
Information:
The interval/cycle, which could be weekly, monthly, bi-monthly, etc., is configured in Monetization. For more information, see Event types.
Note: If the billing profile’s payment type is Pay now, the interval cannot be set, and the customer can be billed anytime. Another name for the Pay now payment type is Pay as you go; therefore, the customer is being billed as they consume the service.
Note:
Multiple subscriptions for the customer can be linked to the same balance group. Also, numerous balance groups can be connected to the same billing profile.There are two main sections under the billing profile, namely:
Bills
The customer Bills tab lists the bills tied to the account. Select one or more rows to enable the action bar and work with the selected bill directly.
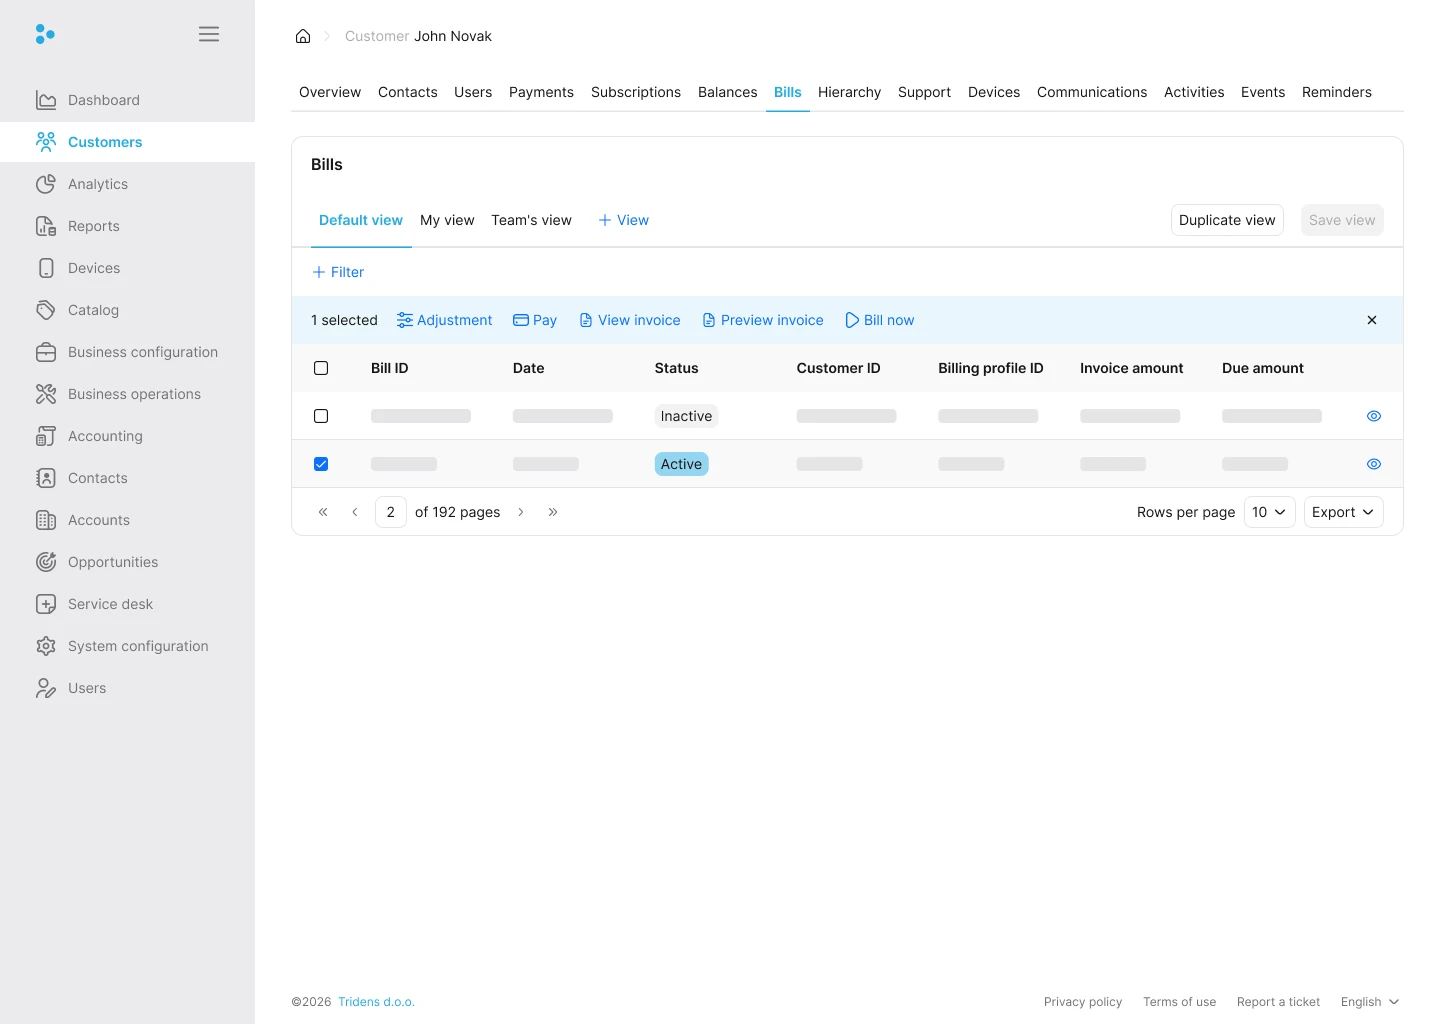
The same bill records are also available from the selected billing profile.
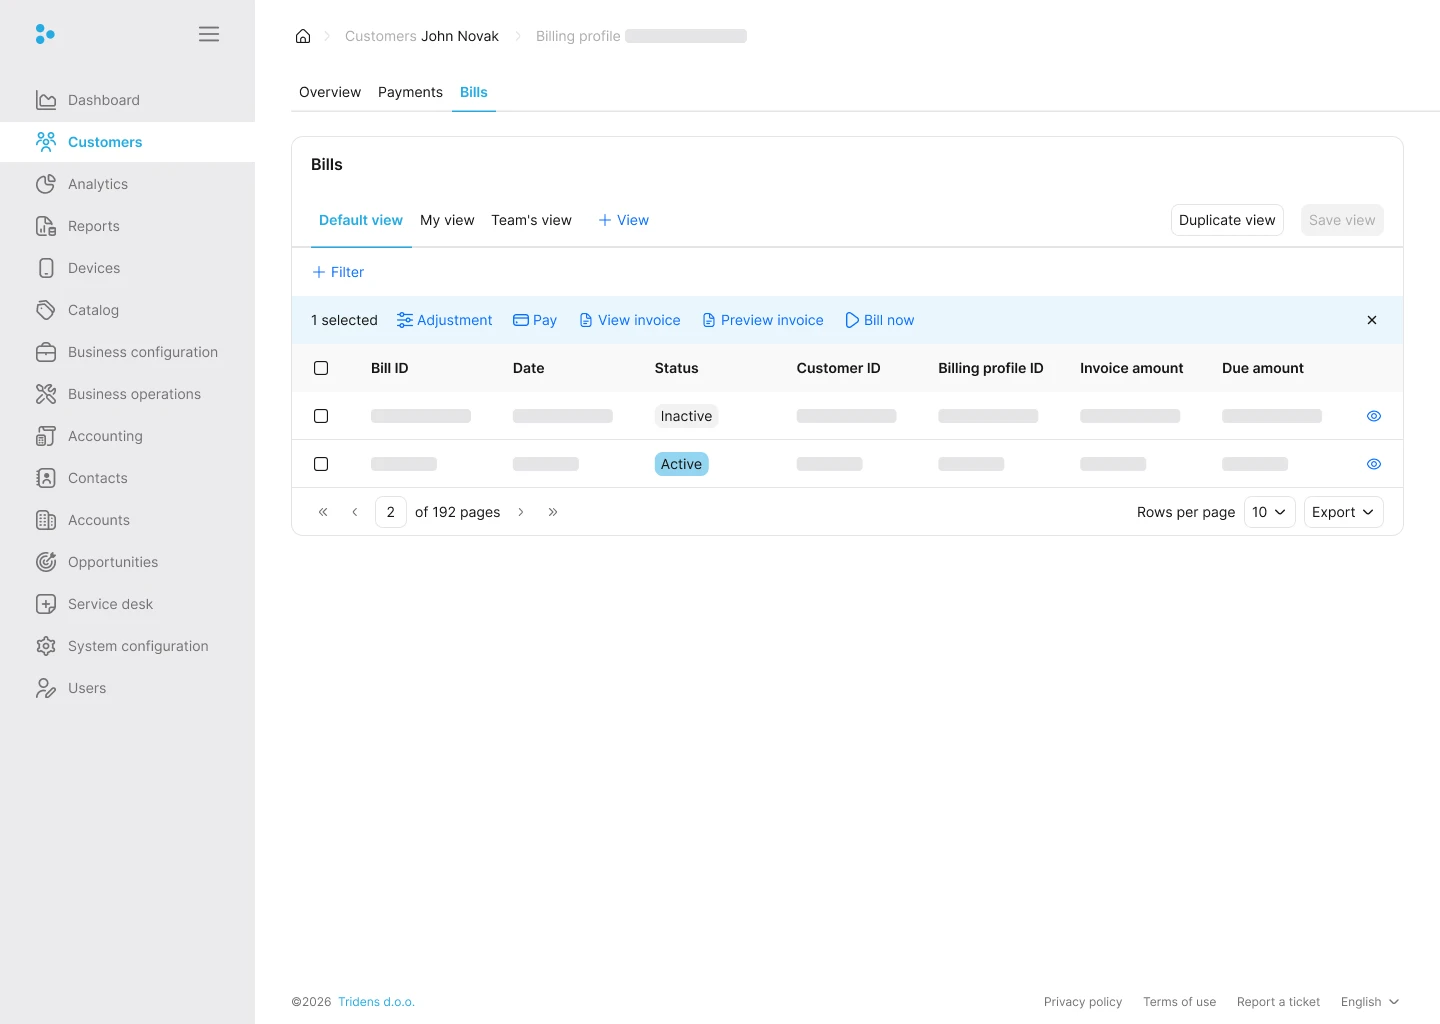
The Bills tab shows the bills that belong to the selected billing profile.
The available actions are:
- Adjustment
- Pay
- View invoice
- Preview invoice
- Bill now
Note:
Invoices are typically generated by a background invoicing job. Running billing does not instantly generate the PDF invoice.The table shows the bill ID, date, status, customer ID, billing profile ID, invoice amount, and due amount.
Information:
The due amount shows how much the customer still owes. It is reduced or cleared once the bill is paid.The bill status
A bill can have the following status:
- Inactive — An inactive bill is only an existing reference to the next bill that the customer will have. It is like a future empty bill prepared in advance to enable Monetization to switch to it when the billing cycle changes, instead of creating the bill at that time—this improves performance.
- Active — An active bill refers to the current bill. Once the billing cycle is over, the active bill goes into the billing status.
- Billing — When the bill is in the billing status, it means the customer has not fully paid the bill.
- Closed — When the bill is closed, it means the customer has paid the bill in full.
For example:
- Inactive bill ID is 111
- Active bill ID is 110 (this is the current bill)
Once the billing cycle is over, the active bill (110) will go into the billing status, meaning it is waiting to be paid. In contrast, the previously inactive bill (111) will become active as the current bill and a new inactive bill (112) will be prepared for the next cycle.
The billing process
Billing is the operation in Monetization where the customer is moved to their next billing cycle. As a result, the previous bills will be moved to the billing status and becomes due. Consequently, the bill with an inactive status will be moved to an active status—this is now the current bill.
Furthermore, Monetization will create a new inactive bill as an existing reference to the next bill the customer will have. It is like a future empty bill prepared in advance to enable Monetization to switch to it when the billing cycle changes instead of creating the bill at that time—this improves performance.
Under each bill, these actions can be performed:
Adjusting a bill: To manually change the amount, balance group, and bill item of a bill, click Adjustment. Furthermore, tax can be included by enabling the with tax toggle switch and providing the tax, tax supplier, and general ledger.
Note:
Debit means the customer is being charged (increasing the charge), while credit means giving something to the customer (lowering the charge).Show bill items: To see the bill items for each bill, click Info. Each bill item can also be separately adjusted; to achieve this, click Adjustment.
Run billing
Under the bills, to run billing, select and click Run billing. Run billing will execute the normal billing process, which is to:
- Shift the billing cycle
- Move the current active bill to the billing status
- Activate the next bill in line (which was previously an inactive bill)
- Create a new inactive bill
Note:
Run billing will not work if the customer is still in their previous billing cycle; that is, run billing can only be initiated for November when it is already December (for monthly customers)—the previous cycle needs to be over to run billing.Bill now
Under the bills, to bill the customer at the moment, select and click Bill now. The bill now will bypass the billing process and pull charges/bill items on the current active bill to an entirely new bill, which will be transferred immediately to the billing status.
Information:
A practical example is a customer leaving in the middle of the cycle and requesting an immediate bill for anything they have accumulated. Since run billing operation cannot be performed yet, bill now will be used to generate a new bill with all the charges, which can then be immediately issued.Billing cycle
A billing cycle in Monetization is an interval during which all charges are collected on one bill/invoice. It is based on the event type and billing day of a billing profile of the customer.
For instance, if the billing profile has a monthly event type with the billing day set to the first day of the month, the billing cycle will constantly shift on the first day of the month while collecting the charges accrued for the previous month.
Information:
The billing process takes care of shifting any billing cycles that are waiting to be billed.The charges can be collected automatically by scheduled payment collection job. Customers can also pay their bills manually via the self-care portal.
Additionally, Monetization can produce a SEPA Direct Debit file for customers with SEPA mandates. It represents a list of transactions that can be uploaded to the bank to take money from the customer’s bank account. The resulting file is then imported to Monetization, which will log the successful payments.
Invoices
An invoice in Monetization is a representation of the bill object that is presented to the customer.
Note:
A separate background job is responsible for generating the invoices. For more information, see Invoicing job.Information:
Invoices can be filtered by date-time, invoice ID, bill ID, or/and status.To generate the invoices in a spreadsheet, click CSV. To print, click Print, and to copy, click Copy.
Note:
They are generated, printed, or copied per paginated page.The Invoice amount refers to the total amount of the bill. The Due amount refers to the remaining amount yet to be paid by the customer.
The Due date represents the last date-time the customer has to pay in full amount for the invoice.
Note:
Once the customer pays for the invoice fully, the bill is marked as Closed.Under the invoice section, a bill can have the following status:
- Billing — When the bill is in the billing status, it means the customer has not fully paid the bill.
- Closed — When the bill is closed, it means the customer has paid the bill in full.
Invoice details
To preview a particular invoice with a template, click Details. Once previewed, it can be saved as PDF, HTML, or JSON.
Note:
You can change from one template to another.Information:
The template for an invoice is configured in Monetization under Business configuration Template Document templates. For more information, see Document templates.Offline invoice payment
To manually enter the payment for a particular invoice, click Wallet. If you have already received the payment through another channel (like cash or wire transfer), you can enter it manually here.
The amount can be configured to be a charge or a refund. Monetization provides three payment methods: cash, credit card, and transfer.
Information:
The transfer payment method means a bank transaction.The provider typifies the payment provider—for example, Stripe, Bank, Paypal, etc. You may also include a payment reference and a note.
Preview invoice
Under bills, the preview invoice will execute a test billing to show you what the next upcoming invoice will look like—it does not show any of the existing bills. The preview invoice with details will include the event history; it is much heavier performance-wise.
To achieve these two functionalities, under bills, select and click Preview invoice or Preview invoice with details.
Balance groups
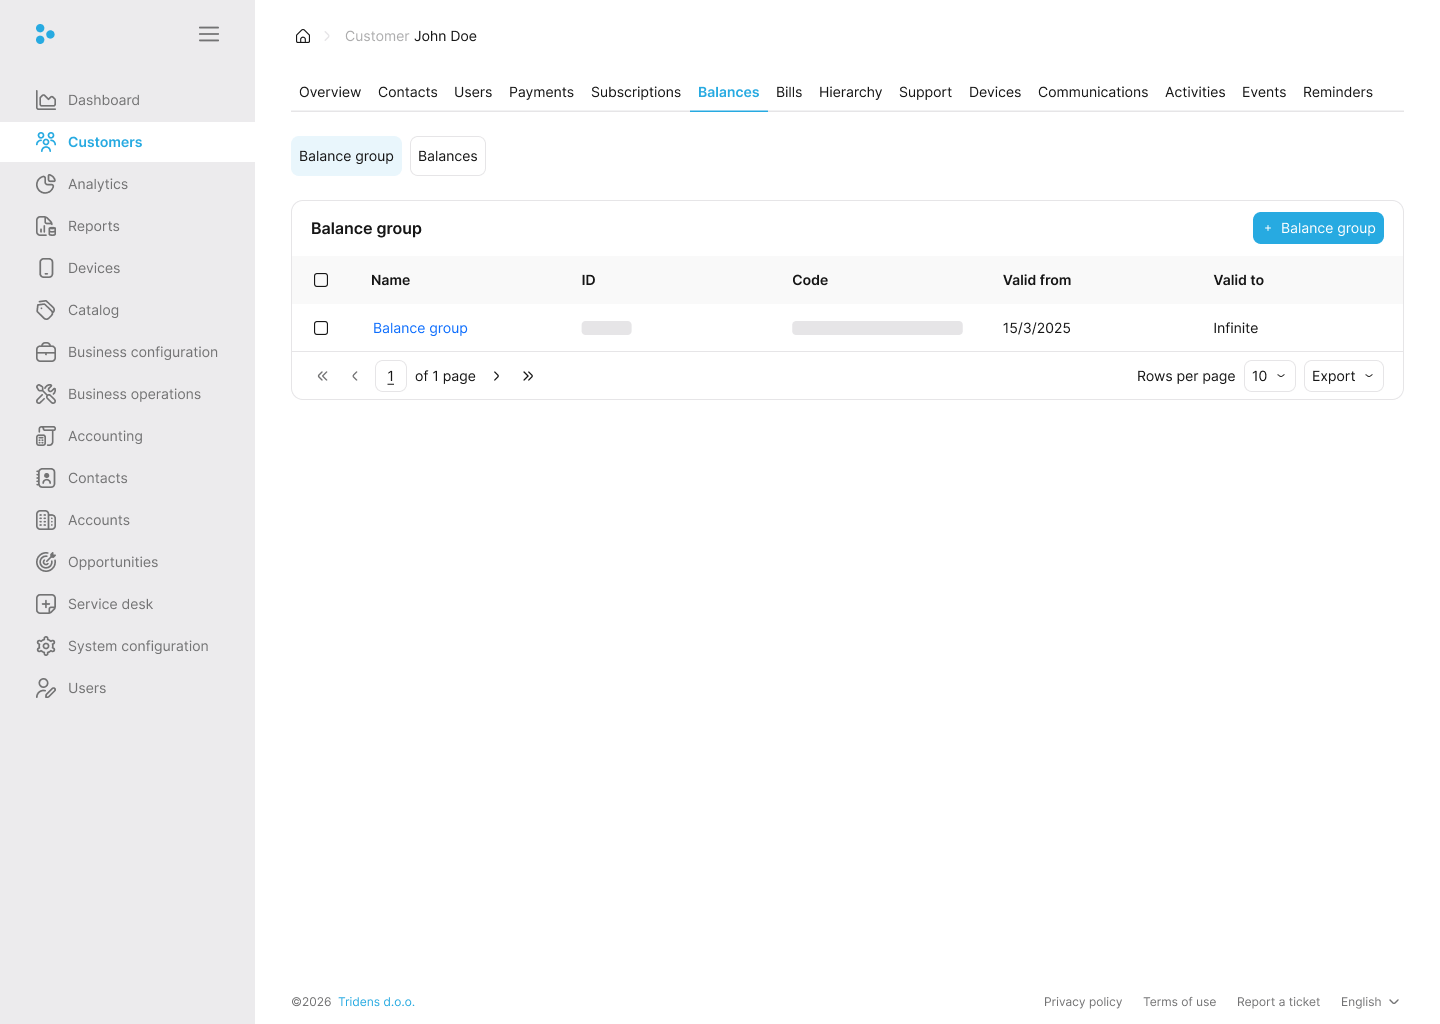
A balance group holds all the balances of the customer. Monetization ties a subscription to a balance group, meaning any impacts resulting from rating service products from the subscription can only impact the balances from that balance group.
Note:
Multiple subscriptions for the customer can be linked to the same balance group. Also, numerous balance groups can be connected to the same billing profile.To create a new balance group, click Add balance group; provide a name and validity period. Additionally, select the billing profile.
Sharing
This section allows for the configuration of the transfer charges in real-time. The customer can either be a member or the owner of a sharing group. Then, if the owner has some resources, by extension, these resources are shared with the members because charges are transferred.
To enable the transfer of resources between customers, click Add sponsorship.
Owner of a sharing group
Select owner mode to make the customer the owner of a sharing group. Provide a group name, validity period, subscription, and policy. Additionally, choose the status.
Members joining the sharing group will be able to use the resources from the selected subscription in real-time; however, subject to the configured policy.
Information:
The policy consists of a name and discounts.Note:
The discount refers to the purchased discount. Hence, it needs to be a purchased discount on the selected subscription.
Essentially, the discount’s configuration acts as a policy on which charges are transferred over. For instance, if you create a discount that targets only VOICE usage events and their monetary impacts and then use this discount as a policy. Only the monetary impacts for voice events will be transferred to the owner.
Once the group is created, the owner can edit the status and validity period or cancel the group. To achieve this, click Edit sharing or Cancel sharing respectively.
Information:
Members of the sharing group will also be visible to the group owner.Member of a sharing group
To add the customer to an existing group, search for the group owner customer account by full name, then select the group.
Information:
The dropdown offers some suggestions, and they get filtered as you type.Once the customer is added as a member of the sharing group, the resources from the subscription of the group owner are consumed by the group members in real-time. However, this is subject to the policy configured on the group.
For instance, if the owner of a sharing group has free 1000 megabytes of data, members of the group are all-consuming from the free available 1000 megabytes.
The customer, as a member of the group, can as well edit the status and validity period of the group or remove themselves from the group. To achieve this, click Edit sharing or Remove from sharing respectively.
Hierarchy
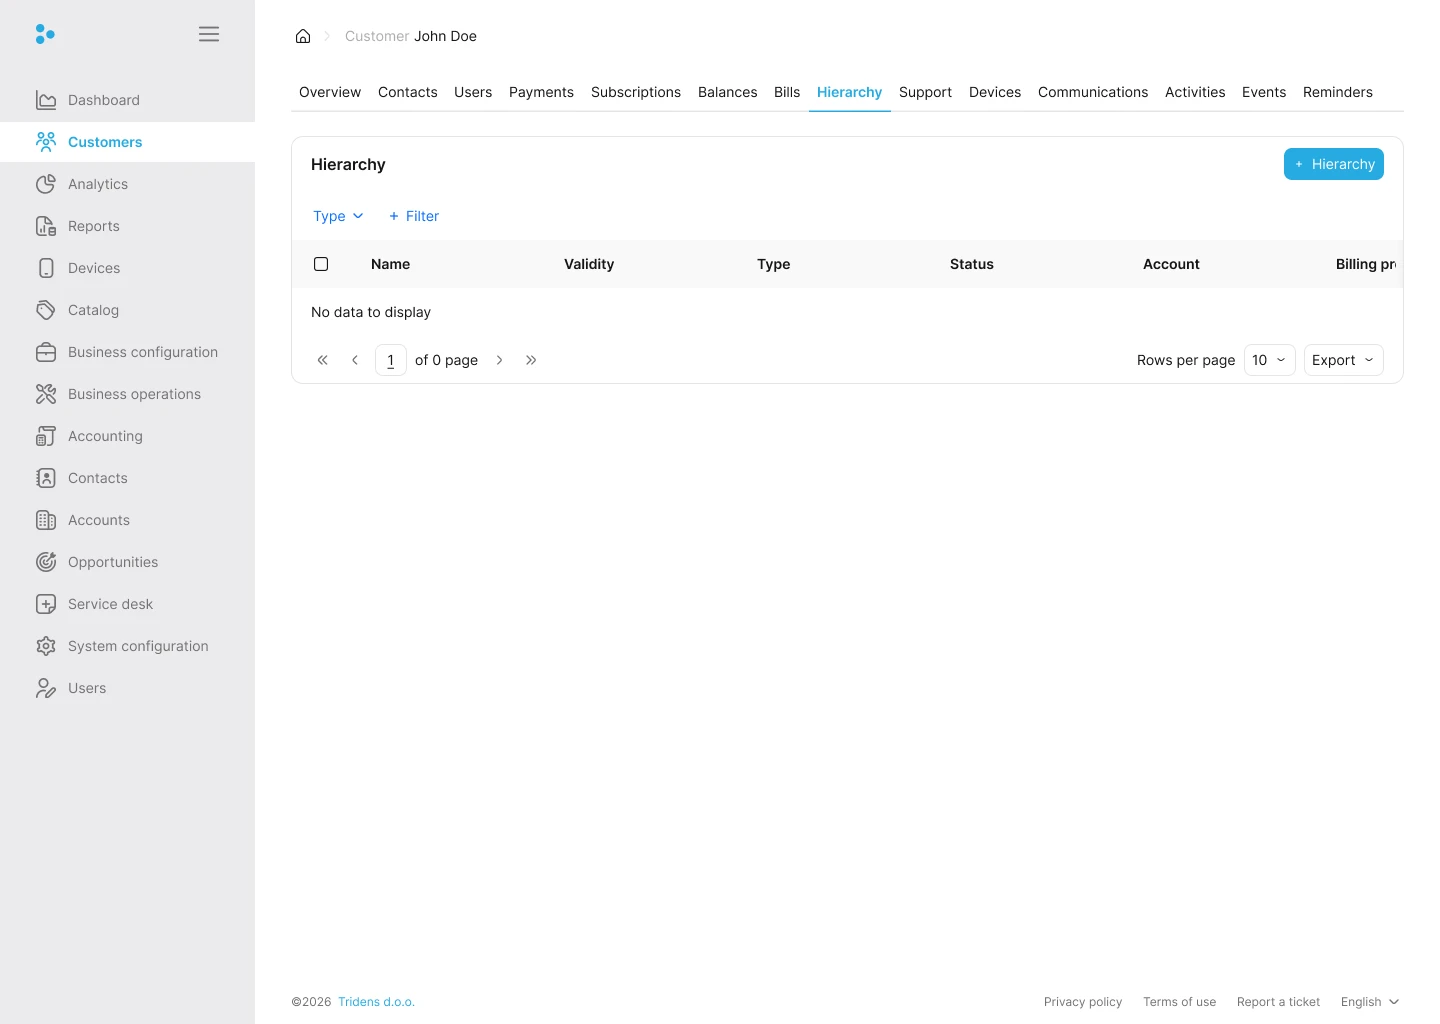
The Hierarchy tab lets you add a customer to a hierarchy group or create a new one. Use the + Hierarchy button to start.
The table shows the hierarchy name, validity, type, status, account, and billing profile.
Information:
If the customer is not part of a hierarchy yet, the table stays empty and shows no data to display.Note:
The charges are not transferred to the hierarchy group owner in real time. Instead, when a member of a hierarchy group receives an invoice at the end of their billing cycle, that invoice is transferred to the hierarchy group owner’s account. This means the group owner becomes payment responsible for the invoice.To enable the transfer of impacts and charges from consuming a service to the owner of a hierarchy group, click Hierarchy.
Owner of a hierarchy group
Select owner mode to make the customer the owner of the hierarchy group. Provide a group name, validity period, billing profile, and status.
The group needs to be connected to a billing profile from the customer account because the entire bill from the members of the hierarchy group is transferred at billing time.
Once the group is created, the owner can edit the status and validity period or cancel the group. To achieve this, click Edit hierarchy or Cancel hierarchy respectively.
Information:
Members of the hierarchy group will also be visible to the group owner.Member of a hierarchy group
To add the customer to an existing group, search for the group owner customer account by full name, then select the group.
Information:
The dropdown offers some suggestions, and they get filtered as you type.The customer, as a member of the group, can as well edit the status and validity period of the group or remove themselves from the group. To achieve this, click Edit hierarchy or Remove from hierarchy respectively.
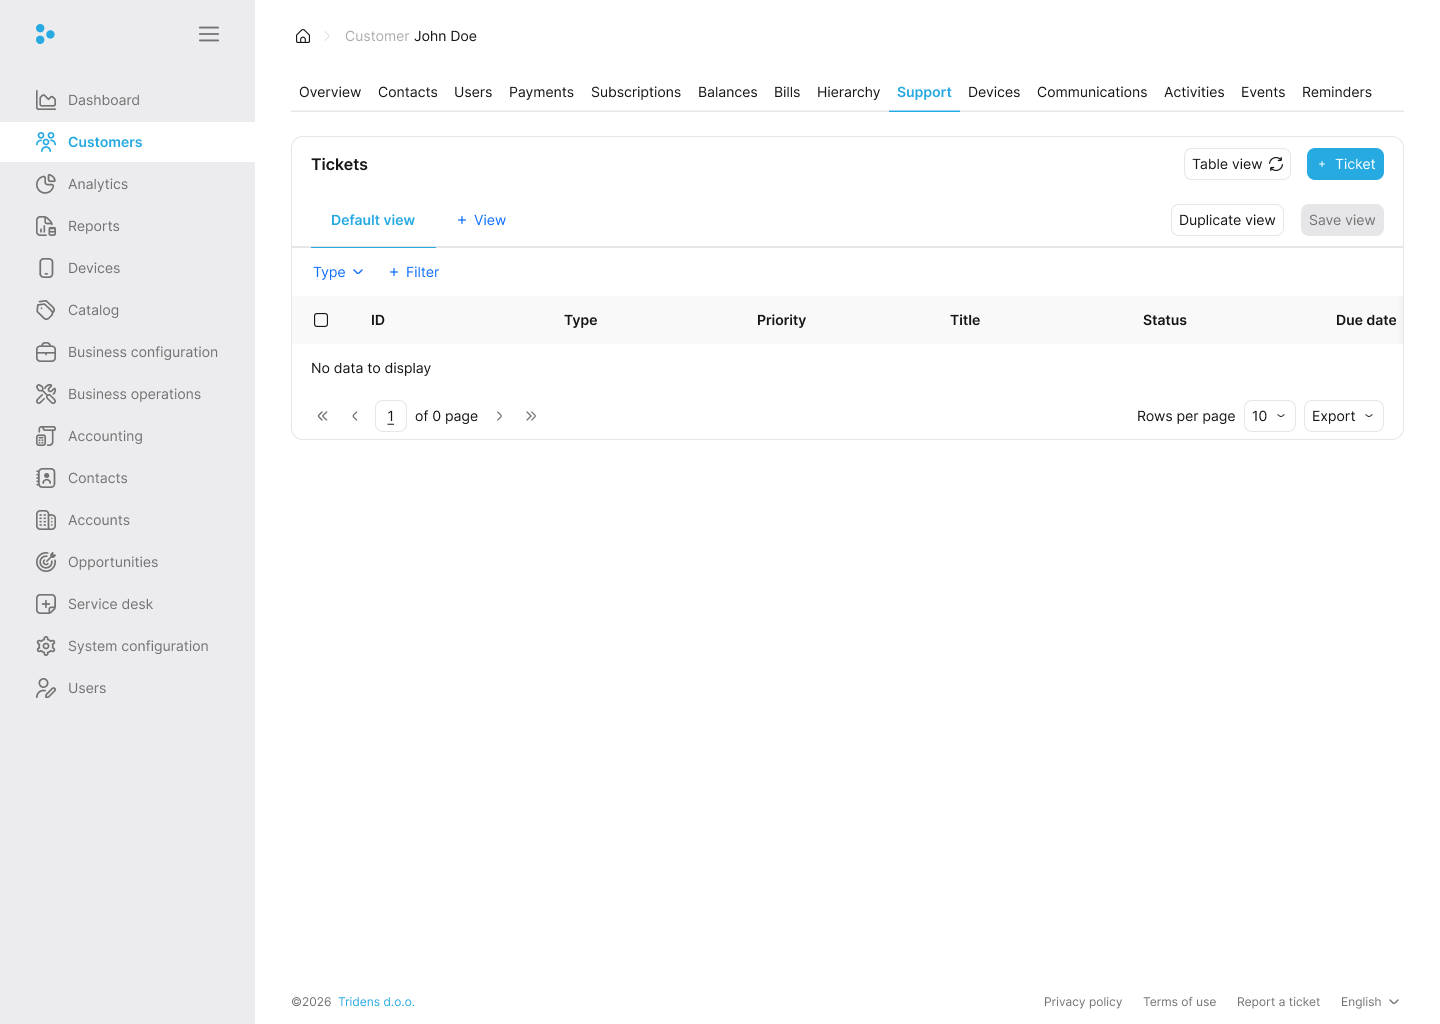
Support
This tab is dedicated to tracking customer support tickets. It displays the status, priority, and assignee for current and past tickets. You can create new tickets or respond to ongoing issues from here.
Devices
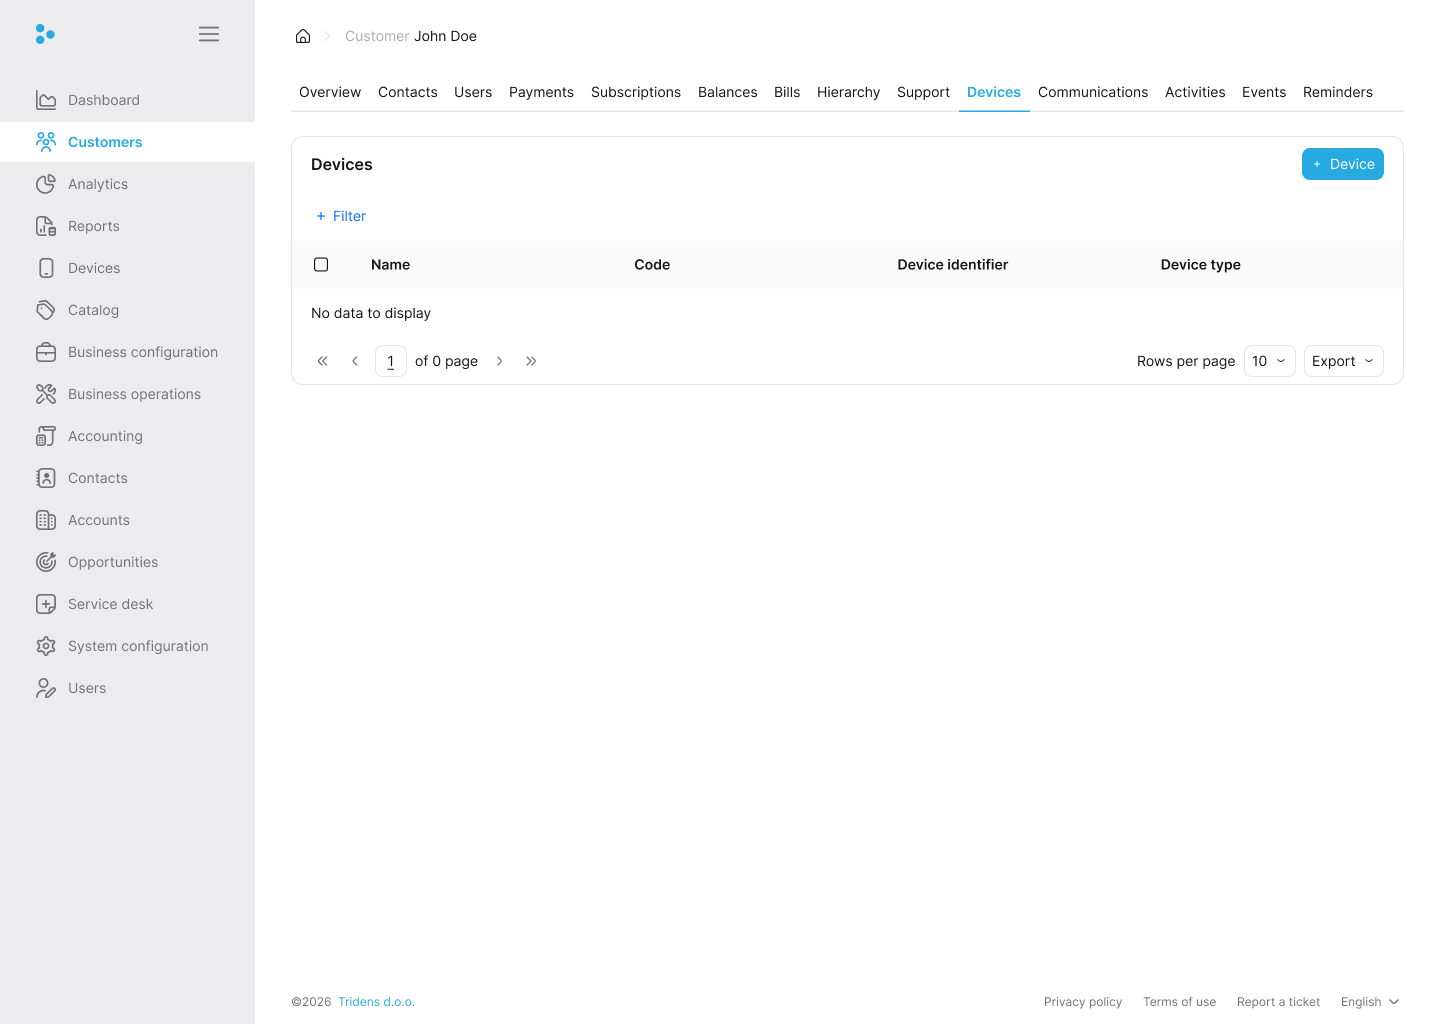
The Devices tab catalogs all hardware or equipment linked to the customer. This can include identifiers for modems, vehicles, or physical nodes representing the endpoints of their subscriptions.
Communications
The Communications tab serves as a log for all system-triggered notifications or emails sent to the customer. Use this history to verify when specific automated messages or password updates were distributed.
Activities
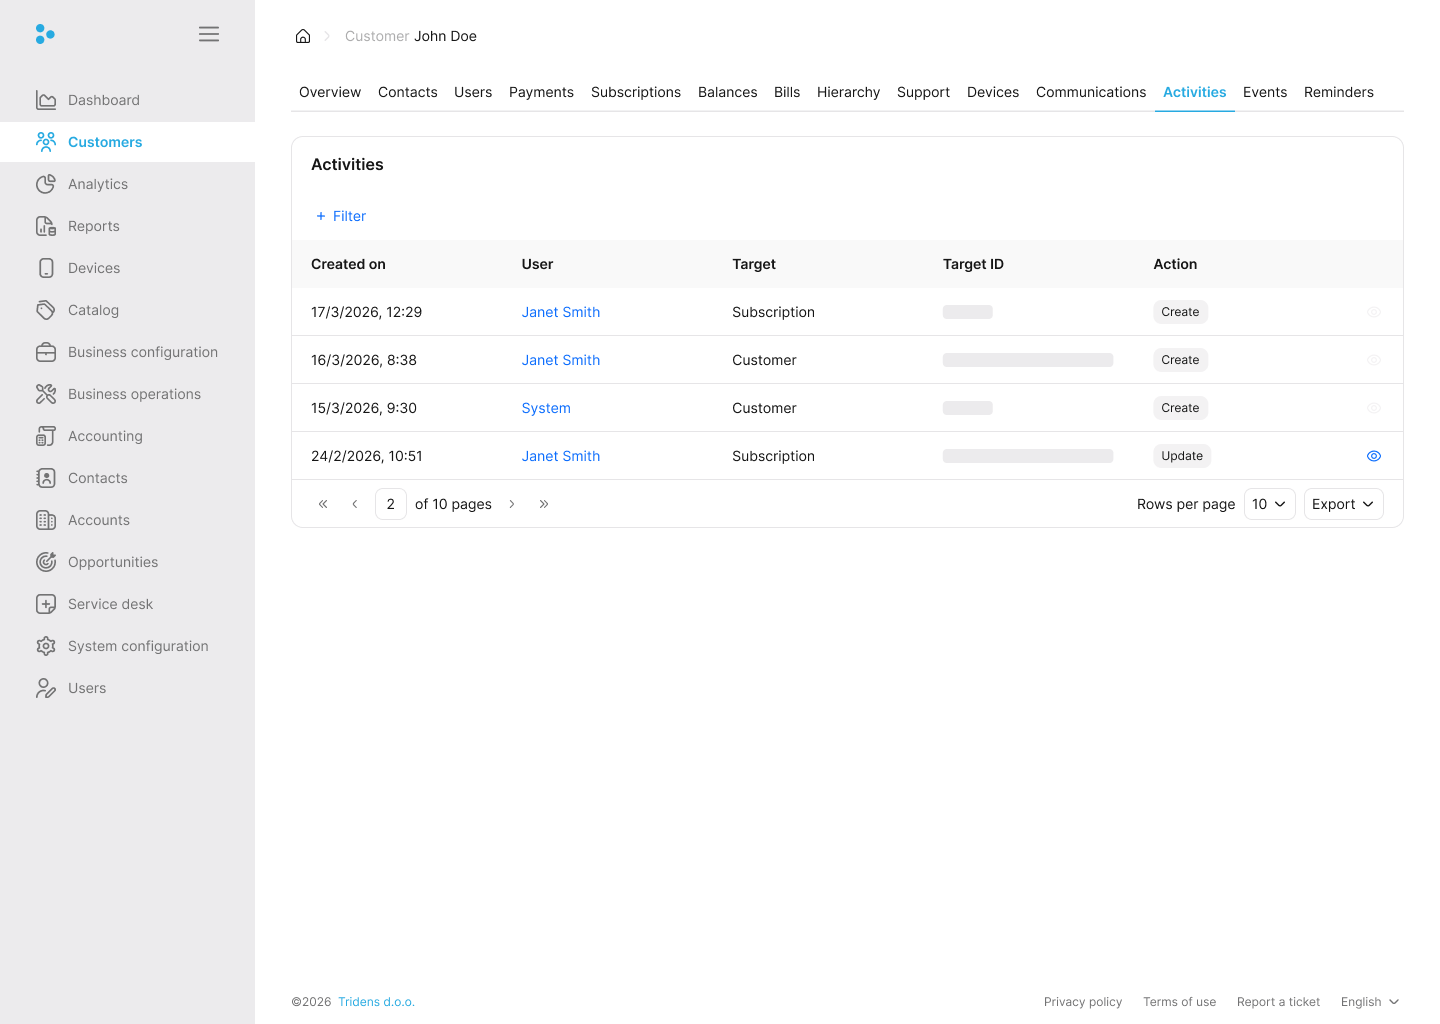
An audit trail providing a timeline of operations performed on the customer’s account. This log captures who changed what, tracing modifications to keep account history transparent.
Events
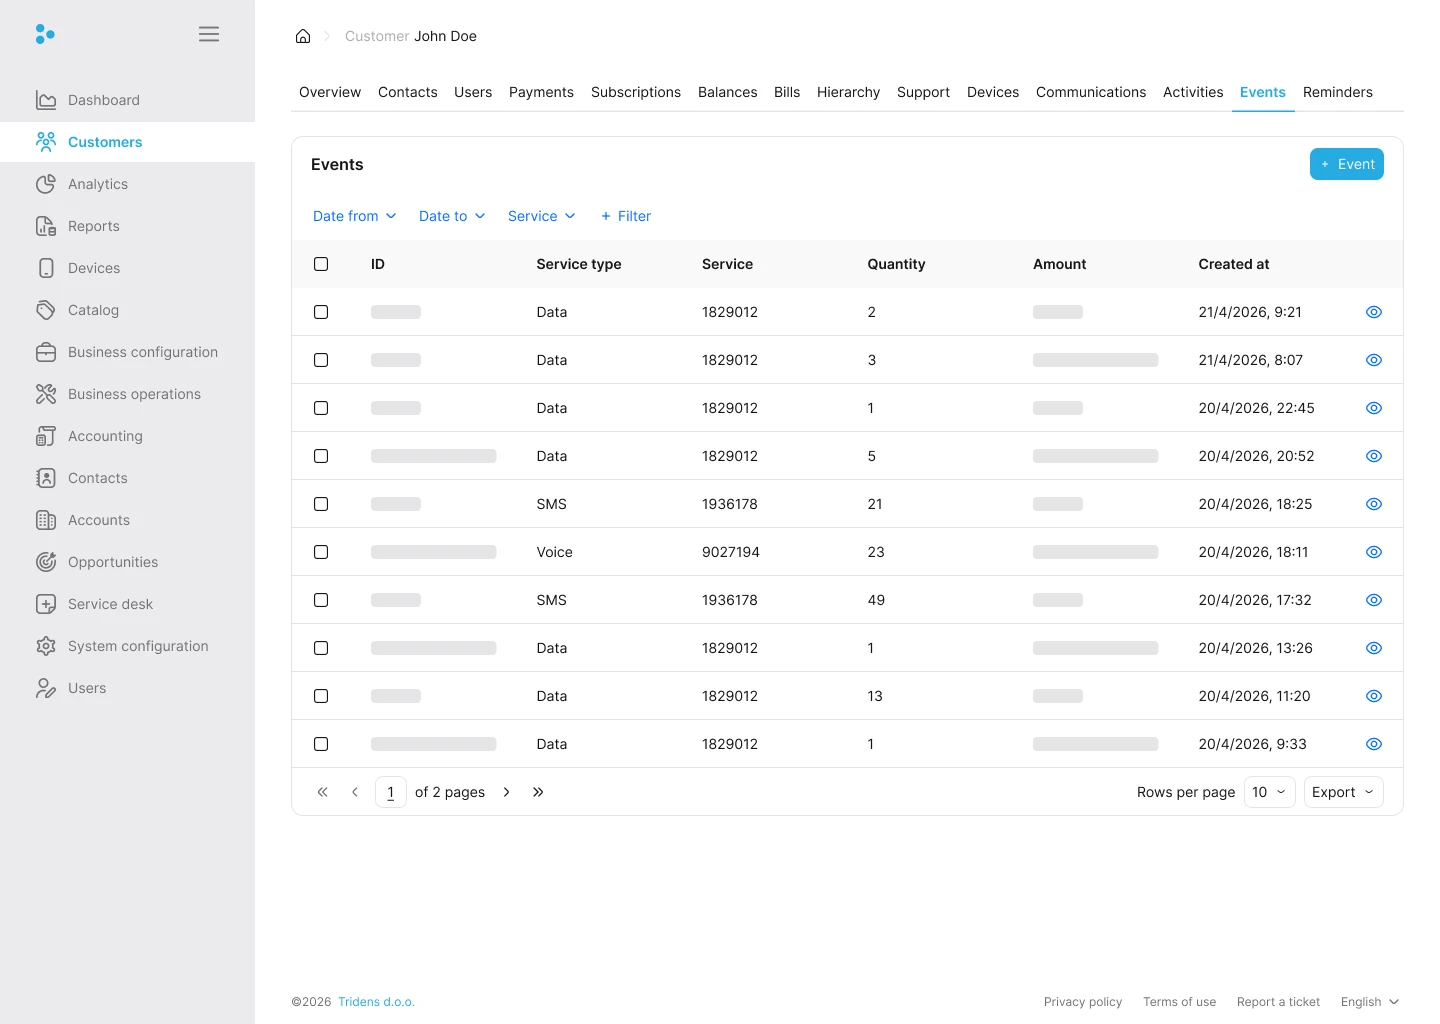
The Events tab shows all usage events originating from the customer’s subscribed services. Use the filters to narrow the list by date or service.
The table shows ID, service type, service, quantity, amount, and created at.
To create a new event, click Event.
Usage
This section shows the usage events for a service from the customer’s subscription for a specific period. It helps you see how the customer is consuming a particular service.
Information:
You can filter usage events by service and date-time. To do this, choose the service and set the start and end date-time. The table updates automatically.To generate the usage events in a spreadsheet, click CSV. To print, click Print, and to copy, click Copy.
Note:
They are generated, printed, and copied per paginated page.The event ID, created at, and the amount, shown as table headings for the usage event, apply to every service usage event. Additional parameters are determined by the mandatory, optional, and rating set fields for the service, which is configured by the service type in Monetization.
For instance, the usage event for a voice call service, apart from the event ID, created at, and amount, can include the following mandatory/optional/rating set fields:
- Start time: This denotes the date-time the call started.
- End time: This denotes the date-time the call ended.
- Origin: This denotes the location of the caller—for example, Slovenia.
- Destination: This denotes the location of the recipient of the call—for example, Italy.
- From: This denotes the person calling.
- To: This denotes the person receiving the call.
The table below shows a usage event for a voice call service from the information above:
Table 1: Voice call service usage event
| Event ID | Created at | Start time | End time | From | To | Origin | Destination | Amount |
|---|---|---|---|---|---|---|---|---|
| 1 | 29/09/2020, 11:57 | 29/09/2020, 11:59 | 29/09/2020, 12:19 | 08094349013 | 08149110574 | Slovenia | Italy | 50 |
To adjust an individual usage event, click Adjustment; only the amount can be adjusted. In addition, to include tax, enable the with tax toggle switch, and provide the tax, tax supplier, and general ledger.
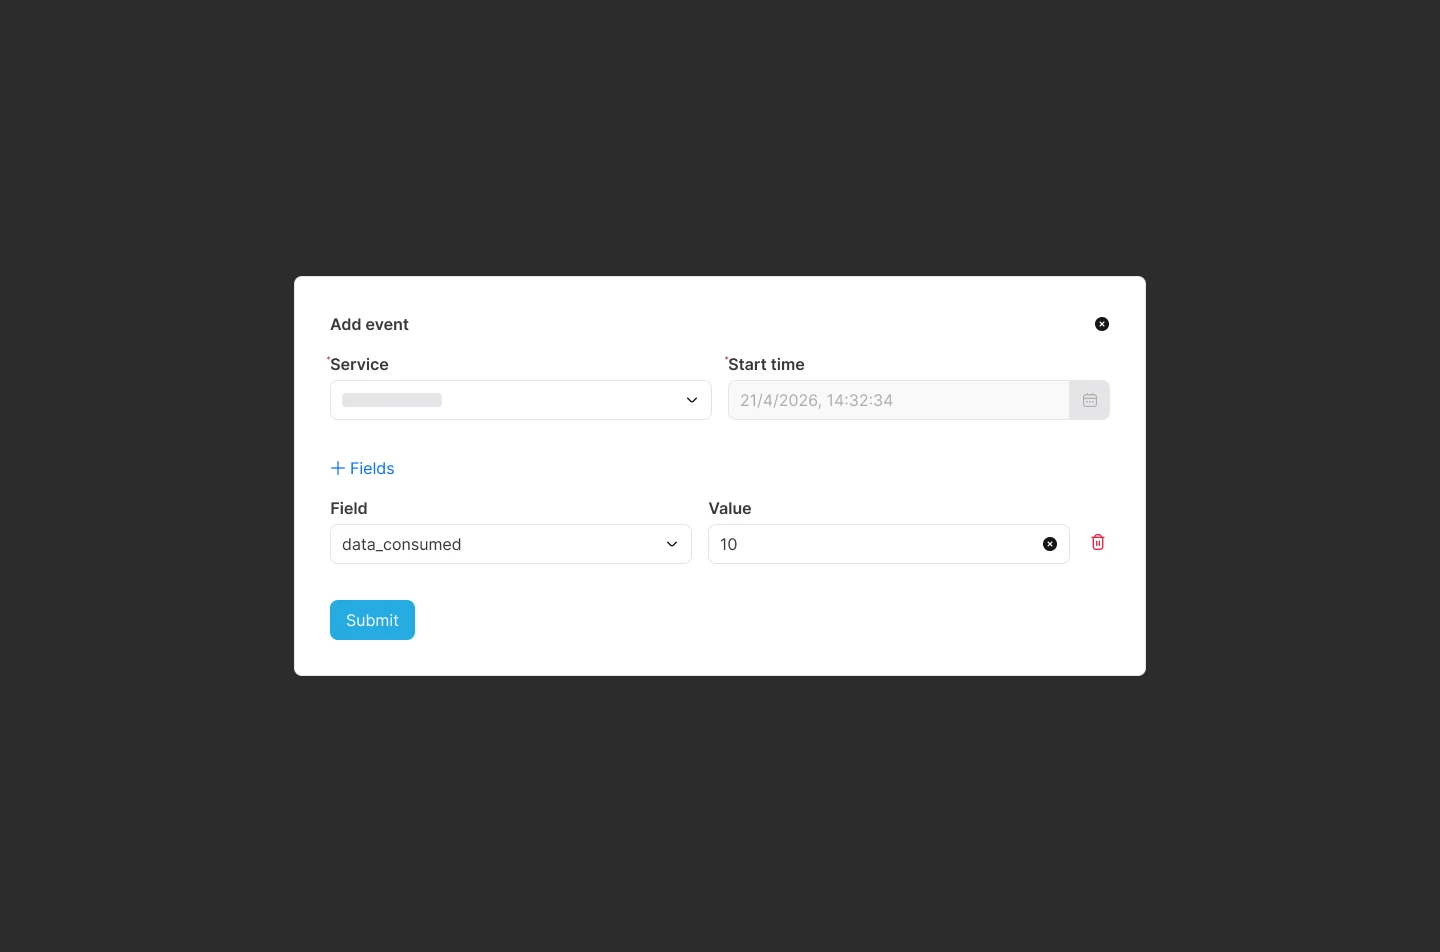
Create event
If you need to manually log a usage event, for example if a system was offline and you need to bill for consumed data, click Create event.
Select the relevant service and specify the start time. Depending on how your service is configured, you will see fields such as Origin, Destination, or Amount. Fill in all mandatory fields. You can also include additional fields by clicking Fields.
Reminders
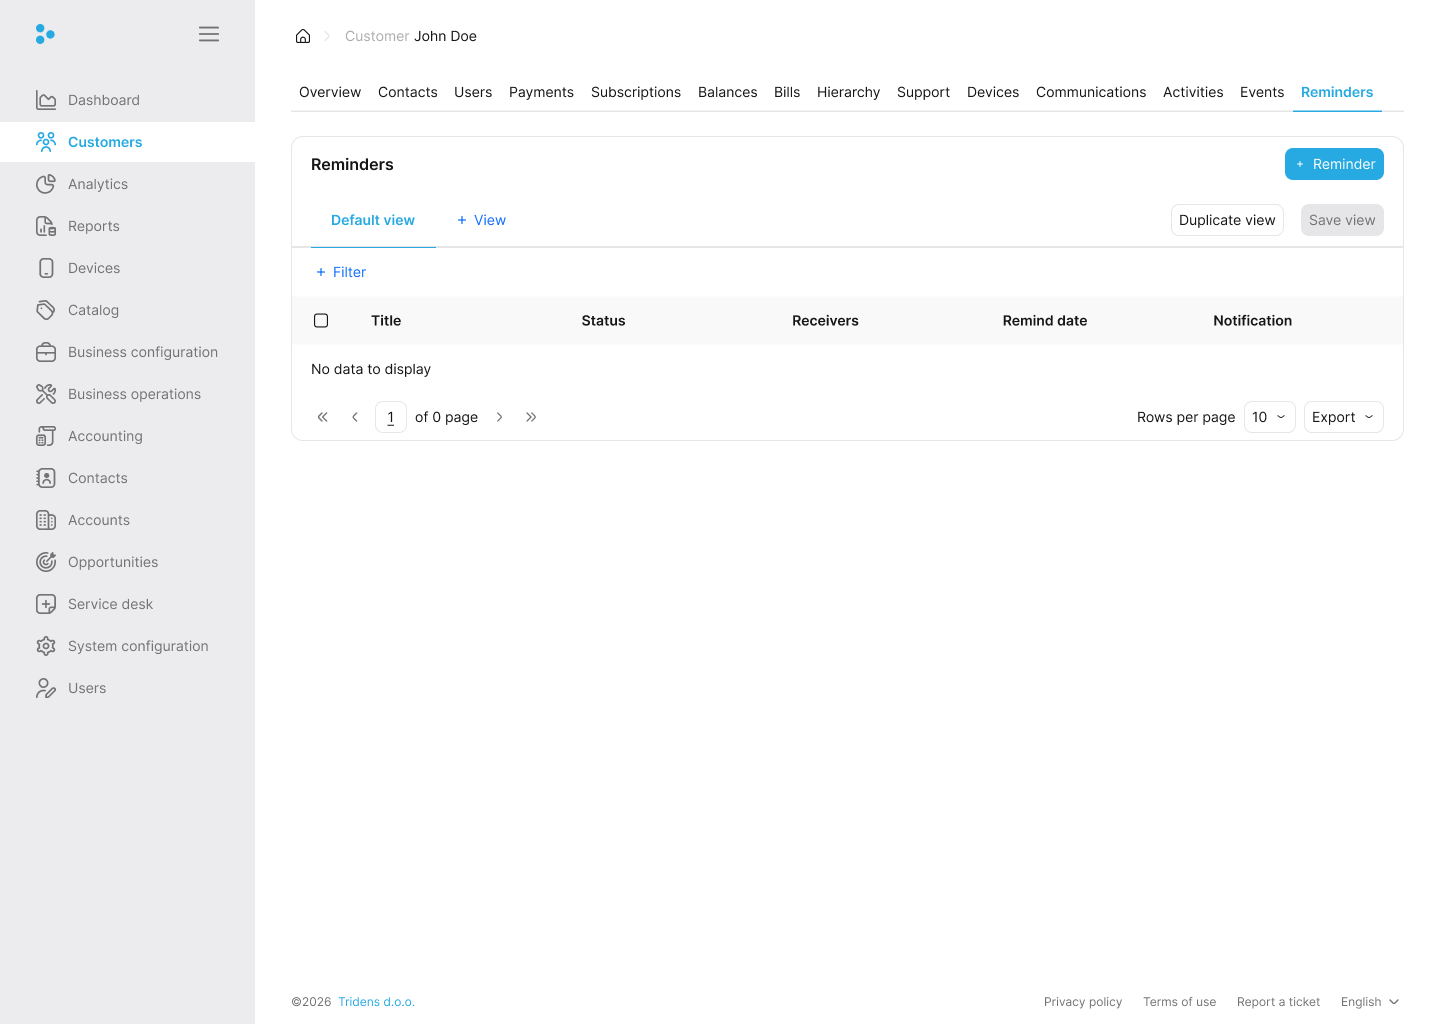
Internal alerts and notes scheduled for a specific date/time. Use reminders to prompt administrative staff about necessary follow-ups regarding the customer.